LogoLogo
HomeCommunityLangstack.comCreate free account
  • 🤝Welcome
  • 🙌Support
  • 💡Get started
    • 📕Learn Langstack
      • Introduction to Langstack
        • Application templates
        • Storage frameworks
        • Account administration
      • Basics and essentials
        • What is an API gateway?
        • How to work with an API gateway
        • What is an Entity?
        • What is an Action box?
          • How to create and work with Action boxes
          • How to perform search in Actions
        • What is an Action?
          • How to create and work with Actions
          • Error propagation
          • Actions in Langstack applications
        • What is a Data type?
          • Simple Data types
        • What is a Variable?
          • Naming rules of a Variable
        • What is a Function?
          • Working with Functions
        • Navigating to a Variable or a Function
        • Implicit Type Conversion (ITC)
        • Explicit Type Conversion
        • Implicit and Explicit Type Conversion for Json
        • Next Steps
      • User management
        • What is a Privilege?
        • What are Groups?
        • What are Users?
      • Introduction to REST API
        • API Name
        • API Group name
        • Request and Response body
          • Request body
          • How to create and work with a Request body
          • Response body
          • How to create and work with a Response body
        • Query strings
          • How to create and work with Query strings
        • Headers
          • How to create and work with Headers
        • Path parameter
        • Create your first API: "Hello World!"
          • Working with API options
        • Exercise 1: GET REST API & Return Response Object
          • Step 1: Create API
          • Step 2: Test the API
        • Exercise 2: Delete a published API
        • Next Steps
      • Introduction to Entities
        • Fields
        • Records
        • Relations
        • Options for an Entity
        • Exercise 1: Customer Accounts and Activities
          • Customer accounts
            • Step 1: Create the Customers Entity
            • Step 2: Create the API
            • Step 3: Update entity through API
          • Customer Activities
            • Step 1: Create the Activities entity
            • Step 2: Create a “1 to Many” relation
            • Step 3: Create the API
            • Step 4: Update entity through API
        • Exercise 2: Customer Records
          • Step 1: Create the API
          • Step 2: Test the API
        • Next Steps
      • Programming with Entities
        • Create
        • Read
        • Update
        • Delete
        • JXPResponse
        • Next Steps
      • Using Triggers
        • After Create Trigger
        • After Update Trigger
        • After Delete Trigger
        • Exercise: Entity & Entity triggers
        • Step 1: Define “After Create” Trigger
        • Step 2: Define “After Update” Trigger
      • Connectors
        • Create a connector
        • SFTP Connector
        • MySQL Connector
        • Next Steps
      • Introduction to ETL pipeline
        • Create an ETL pipeline
        • Data Formats in ETL pipeline
          • Reader
          • Writer
          • Field mapping
        • Shared variables for ETL pipeline
        • ETL functions execution sequences overview
        • Displaying Functions
        • How to perform Search in ETL pipeline
        • Exercise 1: Skip Customer records
          • Step 1: Create the ETL pipeline
          • Step 2: Skip records based on Customer_ID
          • Step 3: Store skipped records in a list
          • Step 4: Store the Skipped Customer record
        • Exercise 2: ETL pipeline, CSV source & FTP Connector
        • Exercise 3: ETL pipeline, Database Source & MySQL Connector
        • Exercise 4: ETL pipeline, CSV Source & FTP Connector using Sections
          • Step 1: Create the ETL pipeline
          • Step 2: Reformat the Join_Date Values and define added fields
      • Multiple Executions, Time Duration, Linked App and Execution Status
        • Skip execution while in progress
        • Time duration settings
        • Linked App
        • Options for Delay Types
        • Execution status
      • Validation pipeline
        • Sequence of Validation pipeline
        • Exercise: Customer Information
          • Step 1: Create a Validation pipeline
          • Step 2: Create the API gateway
          • Step 3: Test the Validation pipeline
      • Introduction to Process
        • Create a process
        • Shared variables for a process
        • Exercise: Customer Anniversary Email Activity
          • Step 1: Check if the join date matches the current date
          • Step 2: Test the Process
      • Introduction to Flows & Flow components
        • What is a Flow?
        • What is a Flow component?
          • What is a Flow component Event?
        • Exercise 1: Customer Anniversary Email
          • Step 1: Create the Flow component
          • Step 2: Create the Flow
          • Step 3: Trigger the Flow
          • Step 4: Check records in the target entity
        • Exercise 2: Store list of customers
          • Step 1: Create the Flow component
          • Step 2: Create the Flow
          • Step 3: Create the API
    • 🌍Tour of Langstack (coming soon)
  • 📘In depth learning
    • 📖User Manual (coming soon)
    • 🔗Connectors
      • MS-SQL connector
        • Data type conversions between Langstack and MSSQL
        • Handling data loss in data type conversions
        • Setting up MS-SQL connector
        • MS-SQL connector as Reader and Writer
        • Using MS-SQL connector in ETL pipeline
          • MS-SQL connector as a source
          • MS-SQL connector as a destination
      • Google Drive connector
        • Set up Google Drive Connector
        • Adding Google Drive path in ETL pipeline Streams
        • Setting up GCP Account, GCP Project, API Enablement, and Credentials (Prerequisites)
          • OAuth 2.0 Client Credentials
          • Service Account Key Credentials
          • API Key Credentials
          • Authorization through Redirect URLs
        • Using Google Drive connector in ETL pipeline
          • Specifying file or folder paths
            • Direct file link
            • Folder link and file name
            • Folder path and file name
            • Folder path excluding file name
            • Folder path including file name
          • Google Drive connector as a source
          • Google Drive connector as a destination
      • AWS connector
        • Introduction
        • Set up AWS S3 Connector
          • OAuth 2.0 Client Type
          • Access Key
          • Public
        • Setting up AWS Account
          • Retrieve Client ID and Client Secret
        • Set up Amazon Web Services (Cognito) Console
          • Retrieve Identity Pool Id
          • Manage Permissions for Roles
          • Adding Redirect URL in Amazon Developer Console
          • User Consent for OAuth 2.0 Client through Login with Amazon
          • Retrieve Access Key Credentials
        • Creating a bucket in AWS
        • Using S3 connector in ETL pipeline
          • Specifying paths
          • Examples
            • AWS S3 connector as a source
            • AWS S3 connector as a destination
      • OneDrive connector
        • Set up OneDrive Connector
        • Setting up Microsoft Azure Account
        • Add URL to Authorized Redirect URLs
        • User Consent for Establishing OneDrive Connection
        • Usage of OneDrive Connector in ETL pipeline
          • Examples
          • OneDrive connector as a source
          • OneDrive connector as a destination
      • Dropbox connector
        • Set up Dropbox Connector
        • Setting up Dropbox Account
        • Add URL to Authorized Redirect URLs
        • User Consent for Establishing Dropbox Connection
        • Usage of Dropbox connector in ETL pipeline
          • Dropbox connector path settings
          • Examples
            • Dropbox connector as a source
            • Dropbox connector as destination
  • 🗃️Use Cases (Coming soon)
    • Use Case 1
    • Use Case 2
    • Use Case 3
Powered by GitBook
On this page
  1. Get started
  2. Learn Langstack
  3. Introduction to ETL pipeline

Create an ETL pipeline

PreviousIntroduction to ETL pipelineNextData Formats in ETL pipeline

Last updated 2 years ago

To create an ETL pipeline, follow the steps below.

  • To go to the ETL pipeline template, select the "ETL pipeline" under the Data management menu.

  • On the Data management>ETL pipeline page, click the [+ ETL pipeline] button.

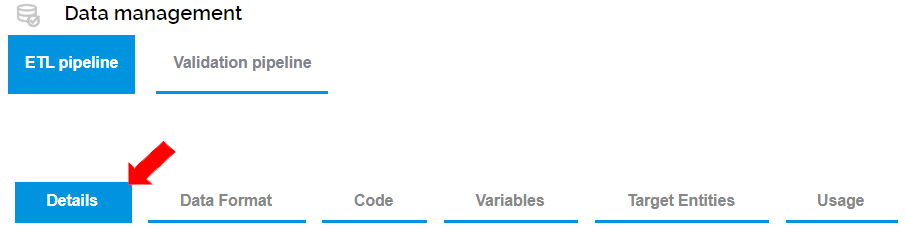
  • The ETL pipeline page displays with the Details tab preselected. The Details tab contains the details about the ETL pipeline and the data to be exchanged.

  • To name the ETL pipeline, in the Details tab, enter a unique ETL pipeline name.

  • Optionally enter a description for the ETL pipeline.

  • The Execution Log Entity is the Entity where the logs of the execution details will be stored. The format for this log entity is predefined and cannot be edited. Users can create a new Entity or select an existing entity from the drop-down menu.

  • To select an execution log, select the log from the list of values in the Details tab.

  • To create an execution log, in the Details tab:

    • Click the [+] button.

    • Enter execution log name.

    • To save the execution log, click the [Save] button.

  • The Data source section defines the details necessary for the Langstack application to connect to the data source. This is the location from where the data is read. The data source can be an Entity or a Connector.

  • To define the data source as an Entity, under the Details>Data source>Entity tab, select the required Entity from the list of values.

  • To select an existing Connector, under the Details>Data source>Connector tab, select the required connector from the list.

  • The Data destination section defines the details necessary for the Langstack system to connect to the data destination. The data destination can be an Entity or a Connector.

  • To define the data destination as an Entity, under the Details>Data destination>Entity tab, select the required Entity from the list of values.

  • To select an existing Connector, under the Details>Data destination>Connector tab, select the required Connector from the list.

  • To align the Data source and Data destination fields, define the relevant settings in the Data Format tab as needed.

  • To save the ETL pipeline, click the [Save] button.

To define a new Connector, click the [+] button under Data Source>Connector tab and enter the relevant details. ()

To define a new Connector, click the [+] button under Data destination>Connector tab and enter the relevant details. ()

For settings related to multiple executions, time duration settings, Linked App, and Execution Status sections, .

💡
📕
click here to follow the steps to create a connector
click here