> For the complete documentation index, see [llms.txt](https://docs.langstack.com/welcome/llms.txt). Markdown versions of documentation pages are available by appending `.md` to page URLs; this page is available as [Markdown](https://docs.langstack.com/welcome/get-started/learn-langstack/introduction-to-process/exercise-customer-anniversary-email-activity/step-1-check-if-the-join-date-matches-the-current-date.md).
# Step 1: Check if the join date matches the current date
To check if the join date matches the current date, follow the steps below.
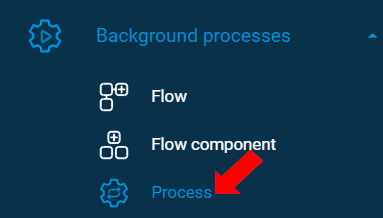
* To go to the Process template, select “Process” under the Background processes menu on the left side panel.
* In the Background processes>Process tab, click the \[+ Process] button.
* To label the Process and enable it, go to the “Details” tab. In the “Details” tab:
1. Enter the Process name as “CustomerJoinDateAnniversaryNotification”.
2. Optionally enter the description for the Process.
3. Ensure the Process is enabled.
* To disallow multiple requests simultaneously, leave the toggle button enabled for “skip execution while in progress”. Enabling this toggle button defines that the execution of this Process will be skipped when there is one already in progress.
* The default value for Process execution is selected as “Immediate”. For this exercise, keep it as is.
* To define the shared variables, go to the “Variables” tab. This tab consists of the shared variable “StartupParameters” with the data type “List”.
* To add a variable, click the \[+ Variable] button.
* Add and define (2) shared variables:
1. To have a variable to hold the day and month of the current date, define the first variable as follows: \
Variable Name: ”strDayMonthToday”, Data Type: “string”.
2. To have a variable to hold the current date, define the second variable as follows: \
Variable Name: “currentDate”, Data Type: “DateTime” and initialize it to “DateTime.Now()” (Navigate to Functions>DateTime>Now).
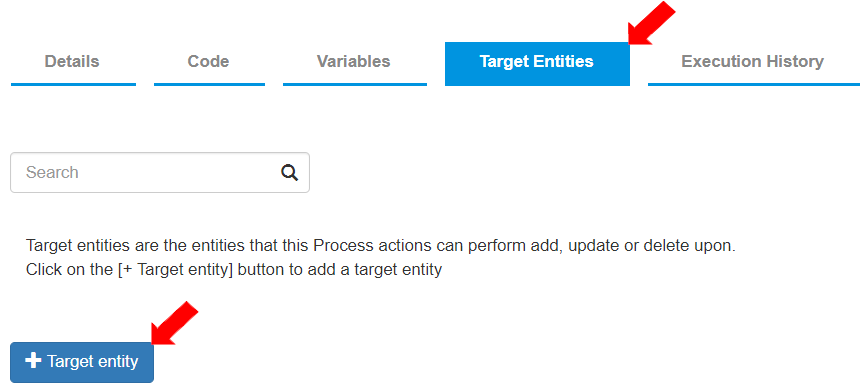
* To create a new Target Entity, go to the “Target Entities” tab and click \[+ Target Entity]. \
This Target entity is where the Process will update the records.
* To define the target entity, select the “Target Entity” from the drop-down menu as “UserName\_Acc\_Activities”.
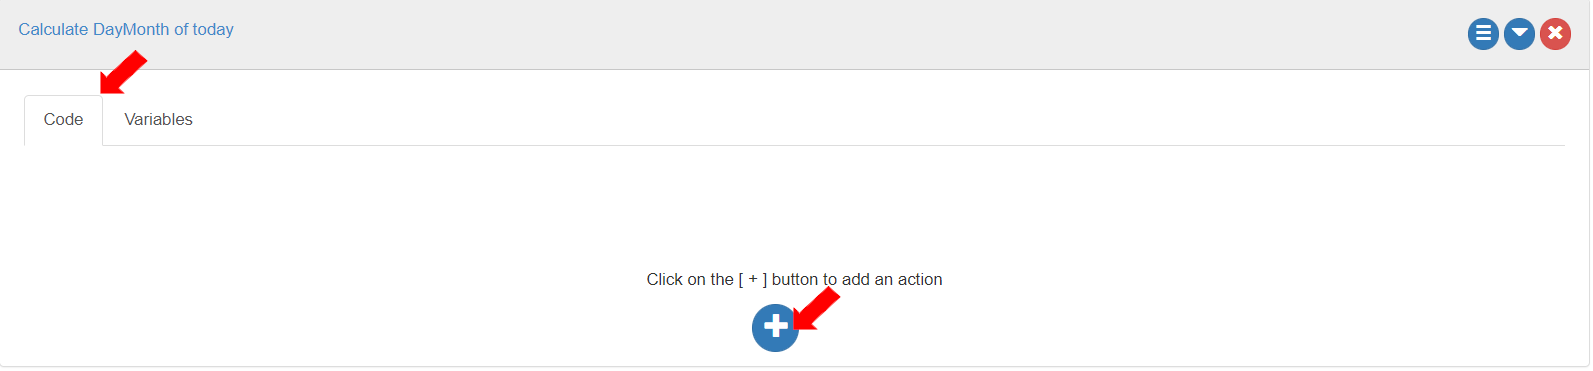
* To add the sequence of actions to check if the current date matches the customer's join date, go to the “Code” tab. \
To create a new “Action box”, click the \[+ Action box] button.
* To calculate the day and month of today, label the Action box as “Calculate DayMonth of today”. \
This is the first “Action box” in which the value for the “DayMonthJoinDate” (field in the entity “UserName\_Acc\_customer”) for the current day will be evaluated and stored in the record to be updated.
* To define variables for the actions in this Action box, go to the Action box>Variables tab. \
To create a new variable, click the \[+ Variable] button. Create three (3) variables.
* To store the value of the current date as a string, define a variable as follows: \
Variable Name: “current\_daymonth”, Data Type: select “string”.
* To store the value for the month in the current date, define a variable as follows: \
Variable Name: “current\_month”, Data Type: “string”.
* To store the value for the day in the current date, define a variable as follows: \
Variable Name: “current\_day”, Data Type: “string”.
* To add an action, go to the Action box>Code tab of the “Action box” and click the (+) button.
* To update the variable with the “current\_day” with the day's value in the current date, define the added Action as follows:
1. Select Action as “Update Variable”.
2. Select the Target variable as “current\_day”.
3. Select Value by navigating the dropdown Functions>DateTime>Now()>Day()>toString(). It will display as “DateTime.Now().Day().toString()”. \
The current day's value is first converted to string and then updated to the variable “current\_day”.
* To update the variable with the “current\_month” with the month's value in the current date, add and define another Action as follows:
1. Select Action as “Update Variable”.
2. Select the Target variable as “current\_month”.
3. Select Value by navigating the dropdown Functions>DateTime>Now()>Month()>toString(). It will display as “DateTime.Now().Month().toString()”. The current month's value is first converted to string and then updated to the variable “current\_month”.
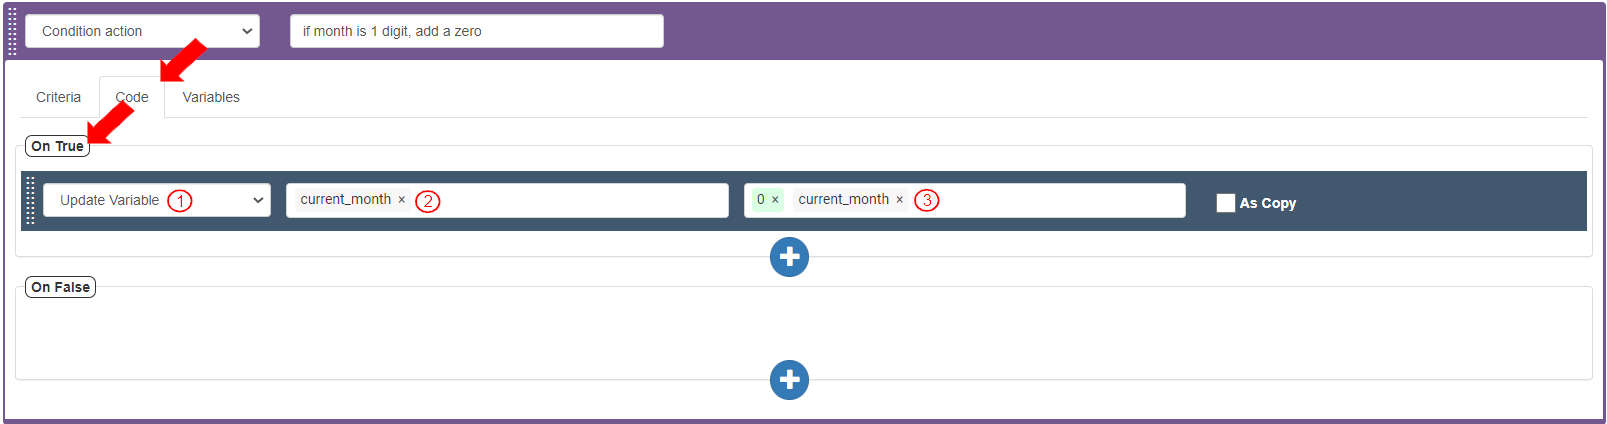
* To add a zero in case the month is of 1 digit, add and define an Action as follows:
1. Select Action as “Condition action”.
2. Enter the label as “if month is 1 digit, add a zero”.
* To check if the length of the month's value is equal to 1, add and define a Criteria bar as follows:
1. Select Source as Variables>current\_month>length(). It displays as current\_month.length().
2. Select Operator as “Is Equal”.
3. Enter Value as ‘1’ and press Enter.
* If the Criteria is returned as true, define an Action in the Code tab>On True section as follows:
1. Select Action as “Update Variable”.
2. Select the Target variable as “current\_month”.
3. Define Source as follows:
1. In the Source, type ‘0’ without quotes and press Enter.
2. Navigate the dropdown and select Variables>current\_month.
* To update the variable with the “current\_daymonth” with the month's value in the current date, add another Action after Condition action and define it as follows:
1. Select Action as “Update Variable”.
2. Select the Target variable to be “current\_daymonth”.
3. Select Value as follows:
1. Navigate and select the “current\_day” variable.
2. Navigate and select the “current\_month” variable.
* To traverse the entity “UserName\_Acc\_customers” for comparing the values of the customer's join date with the current date, define the Action as follows:
1. Select Action as “Traverse Entity”. This action will traverse an entity.
2. Select entity “UserName\_Acc\_customers”. This entity will be traversed.
3. In the field “Treat element in the list as”, the variable named “item” is automatically created and populated. This item contains the value of each element in the list of the records read from the “UserName\_Acc\_customers” entity.
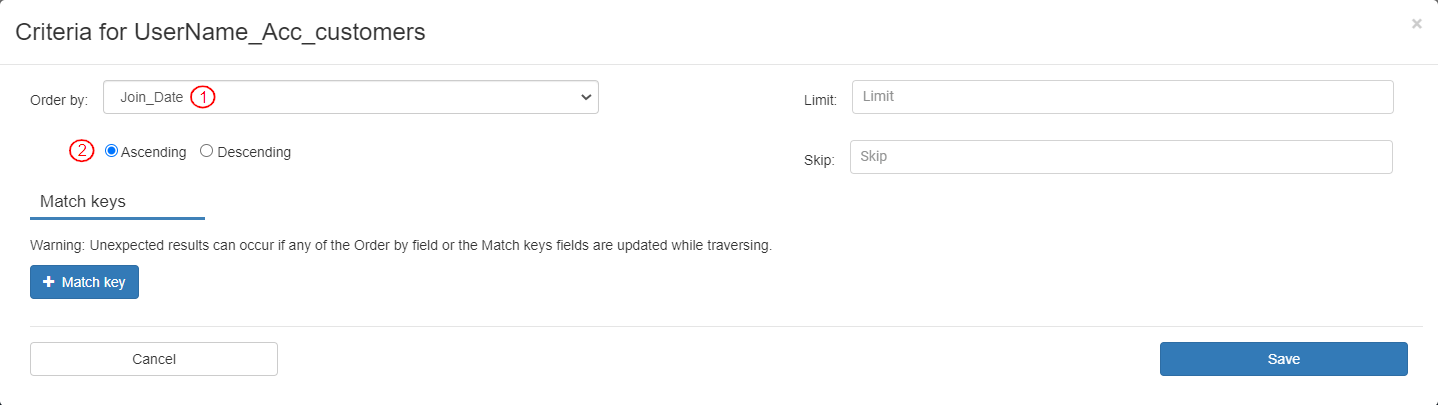
* To set up the criteria for Traverse Entity selected as “UserName\_Acc\_customers”, click the "Criteria Setup" icon.
* To define settings for the traverse such that the entity can be traversed in order by the “DayMonthJoinDate” in the entity in ascending manner, set the criteria as follows:
1. Order By: “Join\_Date”. This defines that the records to be traversed will be ordered by the Join\_Date field of the entity.
2. Ascending: the records to be traversed will be ordered in an ascending manner, i.e., the joining date of the oldest value will be displayed first.
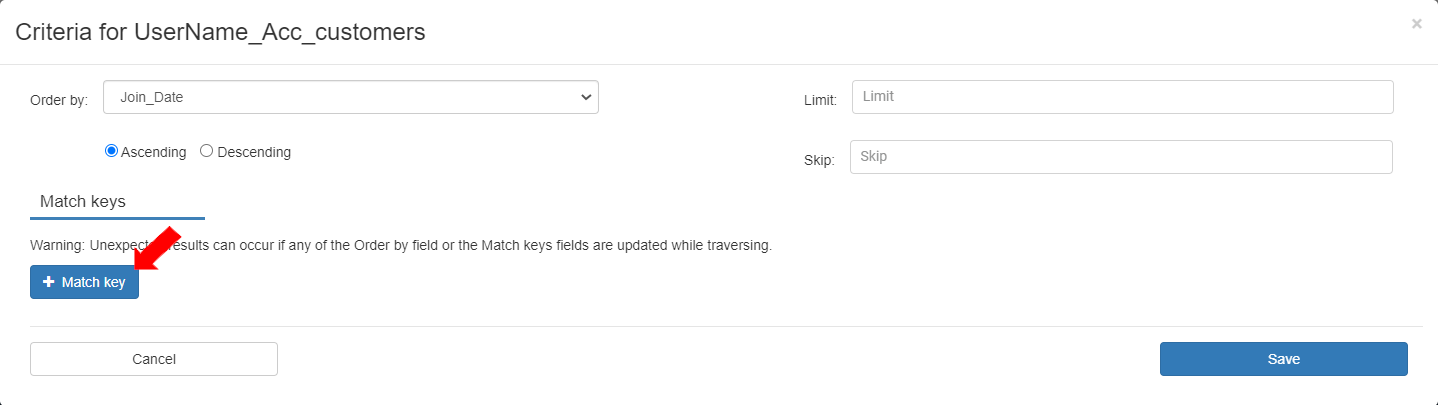
* To add a Match Key, click the \[+ Match key] button.
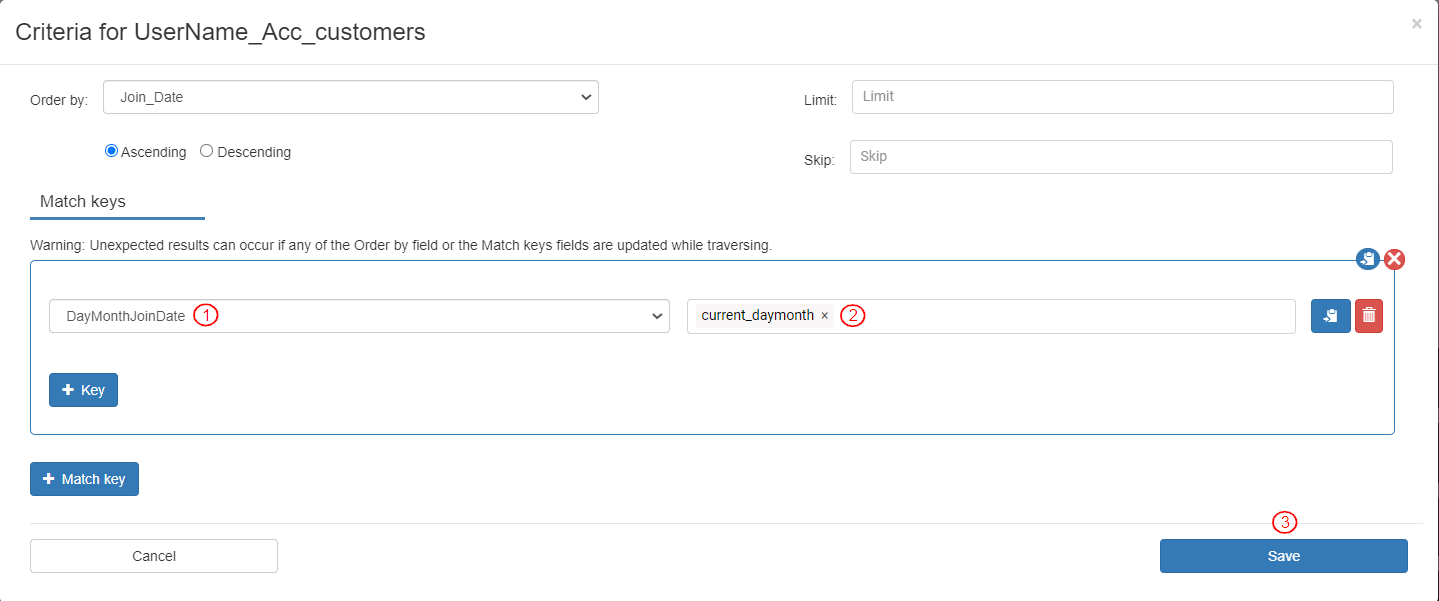
* To define a Match key:
1. Select the field as “DayMonthJoinDate”.
2. Select Variables>current\_daymonth. It displays as “current\_daymonth”. The field “DayMonthJoinDate” will be matched with the variable “current\_daymonth”. \
This match key defines that only those records will be traversed in which the DayMonthJoinDate's value is the same as the values of day and month in the current date.
3. To save the settings, click the \[Save] button.
* To define Variables for Actions in the Traverse Entity Action, go to Variables. \
A variable “item” is already created.
* Add two (2) more Variables.
* To store the value for the existing anniversary, define the first variable as follows:
1. Variable Name: “existing\_anniversary”
2. Data Type: “UserName\_Acc\_Activities”
* To send a response, define the second variable as follows:
1. Variable Name: “new\_anniversary”
2. Data Type: “UserName\_Acc\_Activities”
* To define the actions for the Traverse Entity Action, go to the Code tab and add a new Action.
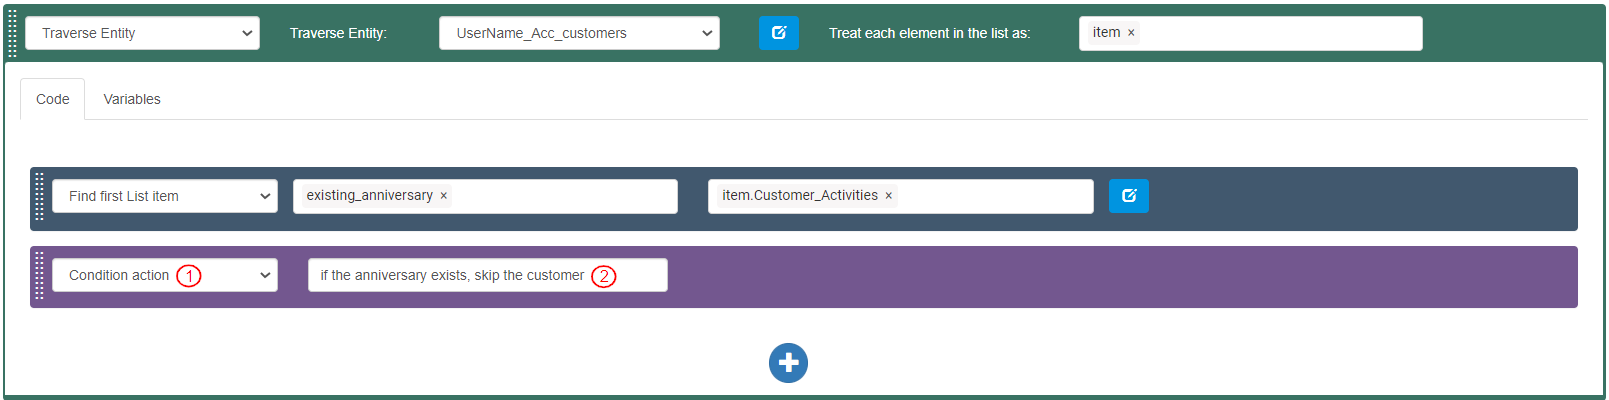
* To find the first item in the list of entity records, define the first Action as follows:
1. Select Action as “Find first List item”
2. Select Target variable as “existing\_anniversary”
3. Select Source List as Variables>item>Customer\_Activities. It displays as “item.Customer\_Activities”.
* To define the criteria for the “Find first List item” Action, click on the “Setup criteria” icon.
* Based on the Filter Settings, if a record for an Anniversary is already created for a customer and the record creation date is the current date, then that record (in the variable “itemActivities”) will be updated into the variable “JoinDateAnniversaryList”. \
\
If by the end of this traverse, “JoinDateAnniversaryList” is empty, a new record will need to be created. If it has any record, the new record will not be created. \
\
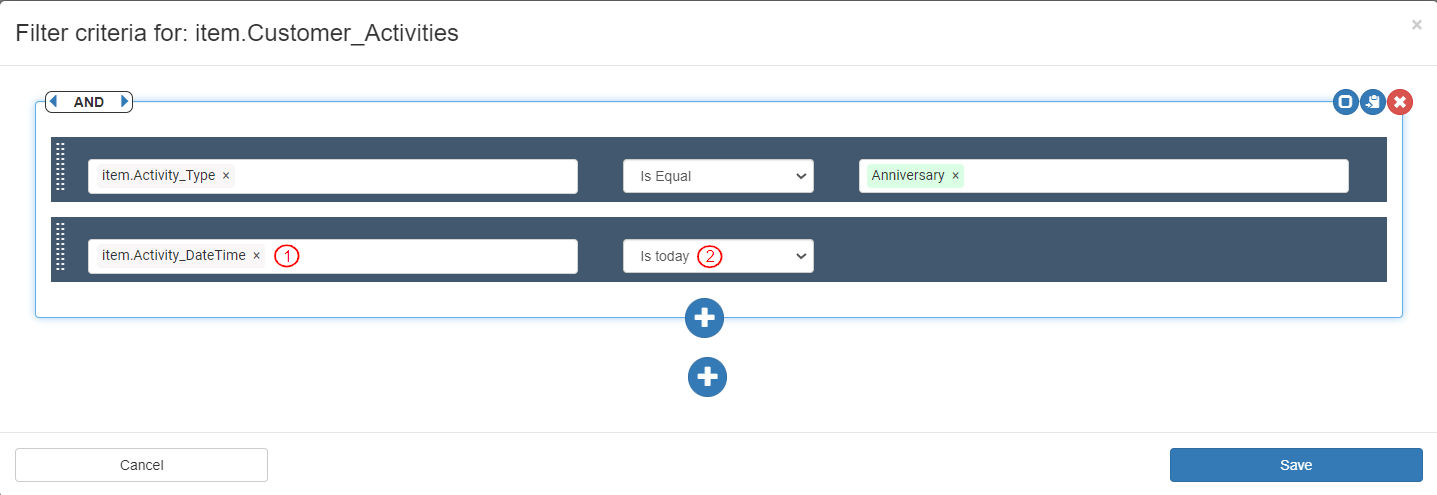
To set up the Filter Settings, add two (2) Criteria bars by clicking the (+) button.
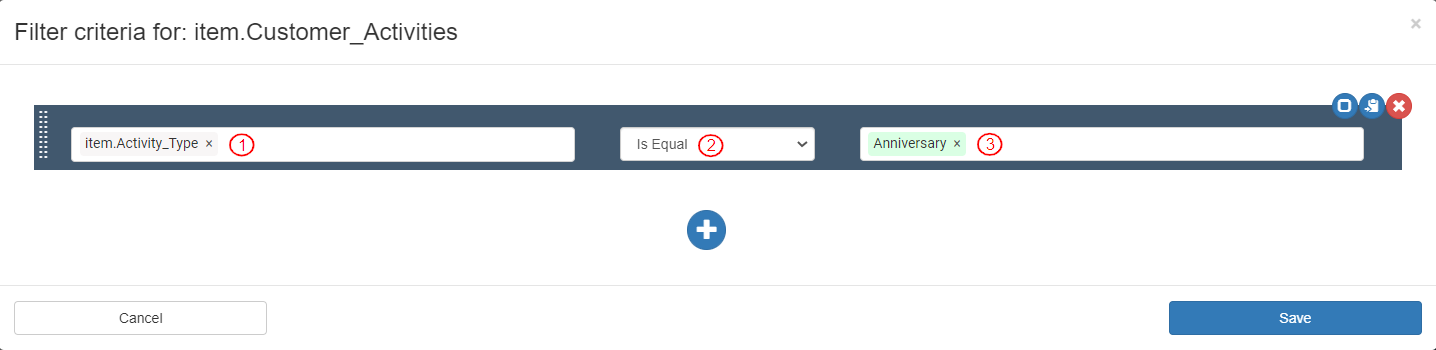
* To check if the Activity Type in the traversed record is equal to “Anniversary”, define the first Criteria bar as follows:
1. Select item>Activity\_Type. It displays as “item.Activity\_Type”.
2. Select Operator as “Is Equal”.
3. Type the text “Anniversary” and press Enter. The text displays in a blue bubble. \
\
This Criteria bar checks if the value of the “Activity\_Type” in the traversed record matches the type “Anniversary”.
* To check if the Activity\_Type in the traversed record is created today, define the second Criteria bar as follows:
1. Select item>Activity\_DateTime. It displays as “item.Activity\_DateTime”.
2. Select Operator as “Is today”.
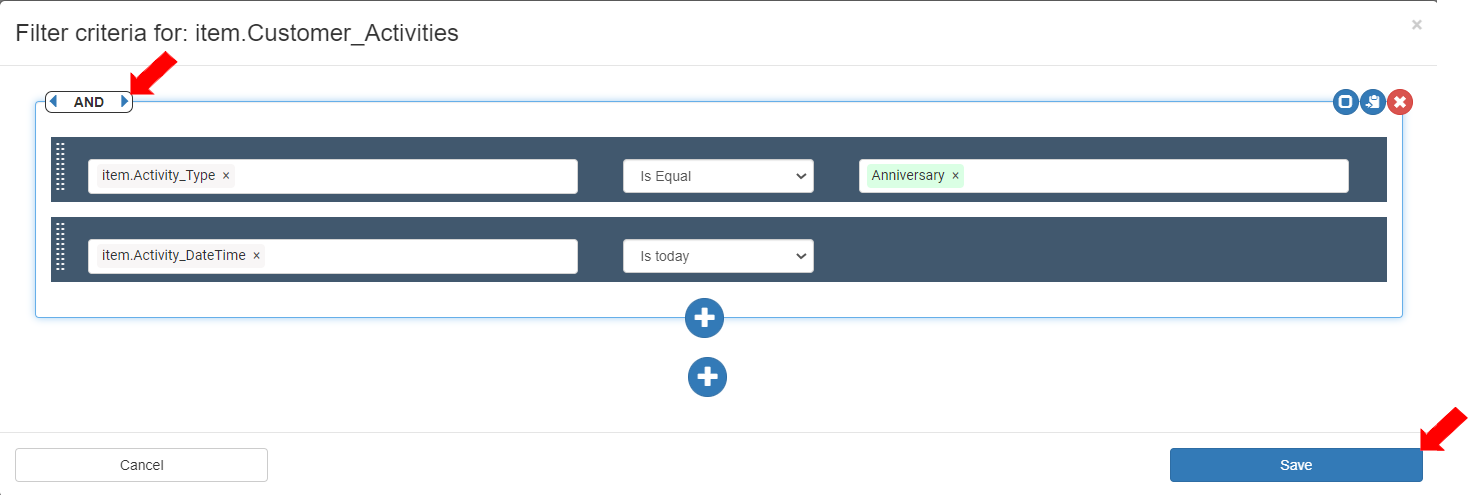
* To set the criteria such that both the Criteria bars must return “True”, keep the logical operator as “AND”. If both of the Criteria bars return “True”, no new record will be created.\
To save the Filter Settings, click the \[Save] button.
* Add a new action in the Traverse entity action and define it as follows:
1. Select Action as “Condition action”.
2. Enter the description as “if the anniversary exists, skip the customer”.
*
```
```
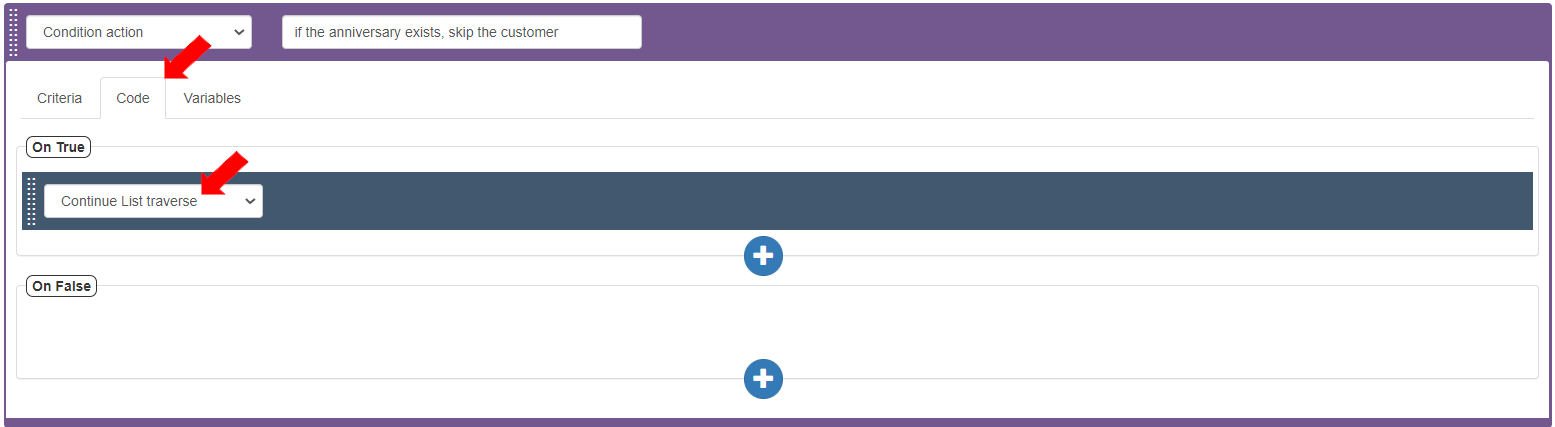
* To check if the value for the “existing\_anniversary” is received, in the Criteria tab add a new Criteria bar:
1. Select Source as Variables>existing\_anniversary. It displays as “existing\_anniversary”.
2. Select the Operator as “Is Set”.
* To define the action if the criteria is True, in the Code tab>On True section add an Action “Continue List Traverse”.
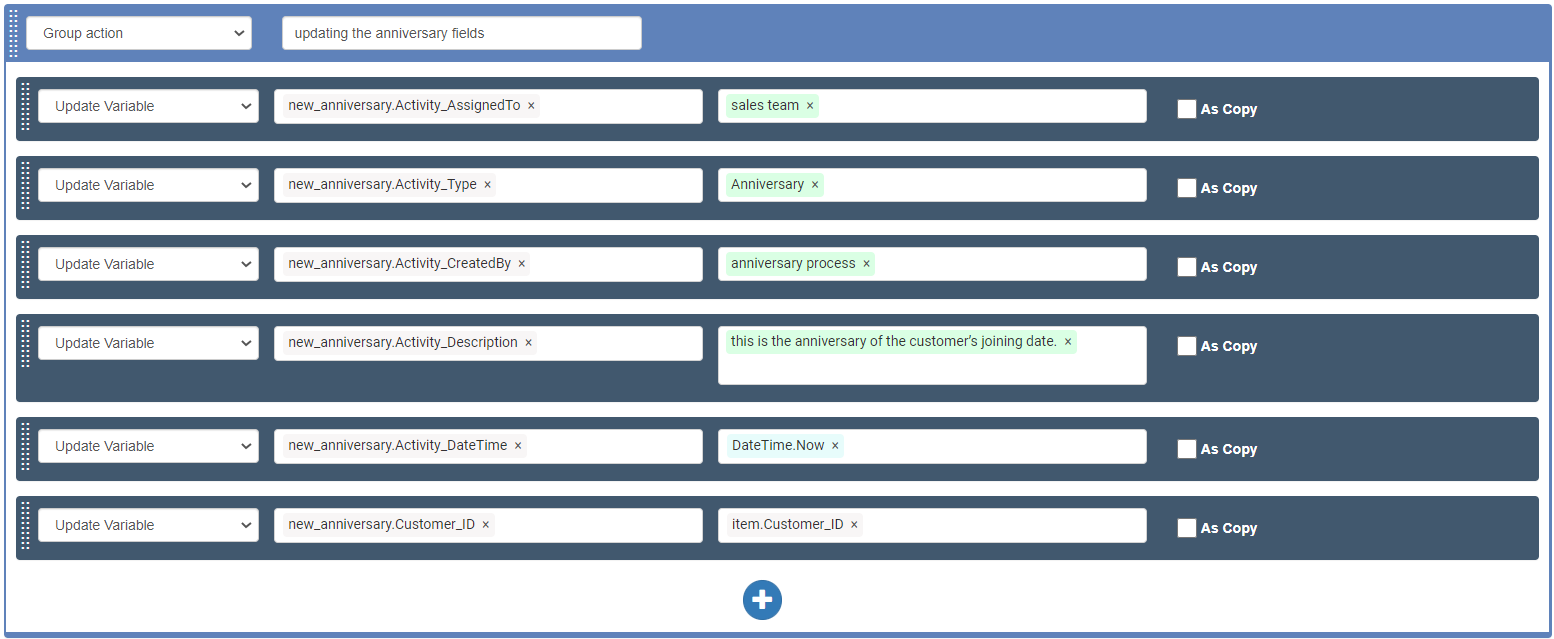
* To add a group of actions for assigning values to the record fields, a new Action after the Condition action and define it as follows:
1. Select Action as “Group action”.
2. Enter the description as “updating the anniversary fields”.
* In this Group action, the actions will be configured to update the values of the fields of the target entity “UserName\_Acc\_Activities” through the variable “new\_anniversary”. \
Add six (6) actions.
* To update the variable “new\_anniversary” with a value for the field “Activity\_AssignedTo” in the entity, define the first Action as follows:
1. Select Action as “Update Variable”.
2. Select Target variable as new\_anniversary>Activity\_AssignedTo and press Enter. It will display as “new\_anniversary.Activity\_AssignedTo”.
3. Enter Value as “sales team” (without quotes) as constant text. This text will be displayed in the field for the record.
* To update the variable “new\_anniversary” with a value for the field “Activity\_Type” in the entity, define the second Action as follows:
1. Select Action as “Update Variable”.
2. Select Target variable as new\_anniversary>Activity\_Type and press Enter. It will display as “new\_anniversary.Activity\_Type”.
3. Add the Value as “Anniversary” (without quotes) and press Enter. This text will be displayed in the field for the record.
* To update the variable “new\_anniversary” with a value for the field “Activity\_CreatedBy” in the entity, define the third Action as follows:
1. Select Action as “Update Variable”.
2. Select Target Variable as new\_anniversary>Activity\_CreatedBy and press Enter. It will display as “new\_anniversary.Activity\_CreatedBy”.
3. Enter Value as “anniversary process” (without quotes) and press Enter. This text will be displayed in the field for the record.
* To update the variable “new\_anniversary” with a value for the field “Activity\_Description” in the entity, define the fourth Action as follows:
1. Select Action as “Update Variable”.
2. Select Target variable as new\_anniversary>Activity\_Description. It will display as “new\_anniversary.Activity\_Description”.
3. Add the Value as “this is the anniversary of the customer’s joining date.” (without quotes) and press Enter. This text will be displayed in the field for the record.
* To update the variable “new\_anniversary” with a value for the field “Activity\_DateTime” in the entity, define the fifth Action as follows:
1. Select Action as “Update Variable”.
2. Select Target variable as new\_anniversary>Activity\_DateTime. It will display as “new\_anniversary.Activity\_DateTime”.
3. Select the Value as Functions>DateTime>Now(). It will display as “DateTime.Now()”. This will update the field for the record with current date information.
* To update the variable “new\_anniversary” with a value for the field “Customer\_ID” in the entity, define the sixth Action as follows:
1. Select Action as “Update Variable”.
2. Select Target variable as new\_anniversary>Customer\_ID and press Enter. It will display as “new\_anniversary.Customer\_ID”.
3. Select the Value as Variables>item>Customer\_ID. It will display as “item.Customer\_ID”.
* The Group action will look as per the image below.
* To create a new record, add a new Action after the Group action. \
\
To update the values of the fields updated in the variable (by the first six actions) into a variable createRecord and create the record in the target entity, define the Action as follows:
1. Select Action as “Create Entity record”. This action creates a new record in the Target Entity and its related entities.
2. Add a new variable by clicking \[+] and name it “anniversary\_response”. To save this variable, click the \[Save] button. This variable will be the data type JXPResponse variable and will display the success or failure of the record creation.
3. Select Entity variable as “new\_anniversary”. The information of the fields stored in this variable will be populated in the newly created record in the target entity.
* To save the Process, click the \[Save] button.
* To publish the Process, click the \[Publish] button.
{% hint style="info" %}
For this exercise, skip the upcoming steps with the “Trigger Flow” action as these are a part of exercises in Introduction to Flows & Flow components. Save and publish the Process, and proceed to [Test the Process](/welcome/get-started/learn-langstack/introduction-to-process/exercise-customer-anniversary-email-activity/step-2-test-the-process.md) section.
{% endhint %}
### Triggering Flow
To trigger a flow, add a new action after "Create Entity record" and follow the steps below:
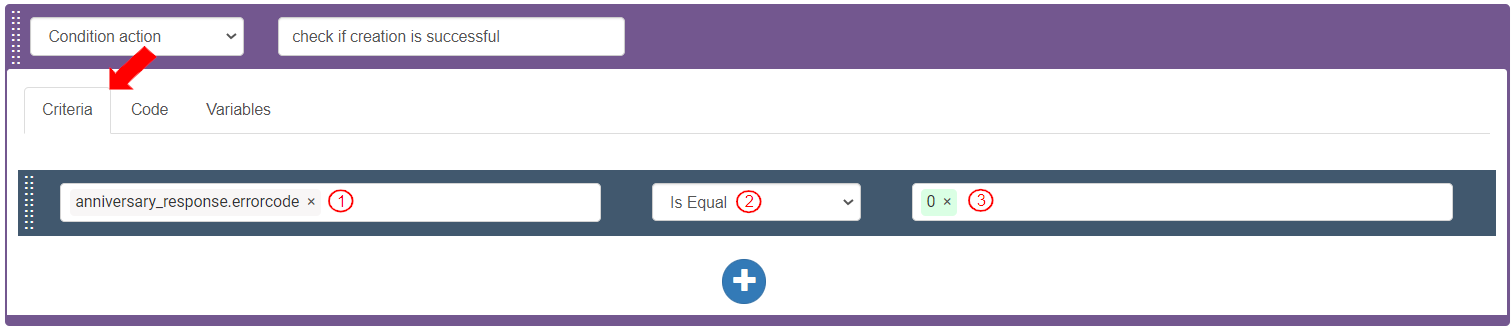
1. To check if the record is created successfully, add and define an Action as follows:
1. Select Action as “Condition action”.
2. Enter the description as “check if creation is successful”.

1. To check if the error code is equal to “0”, in the Criteria tab, add a Criteria bar as follows:
1. Select Variables>anniversary\_response>errorcode. It displays as “anniversary\_response.errorcode”.
2. Select Operator as “Is Equal”.
3. Type the Integer value as “0” and press Enter. The text displays in a blue bubble.
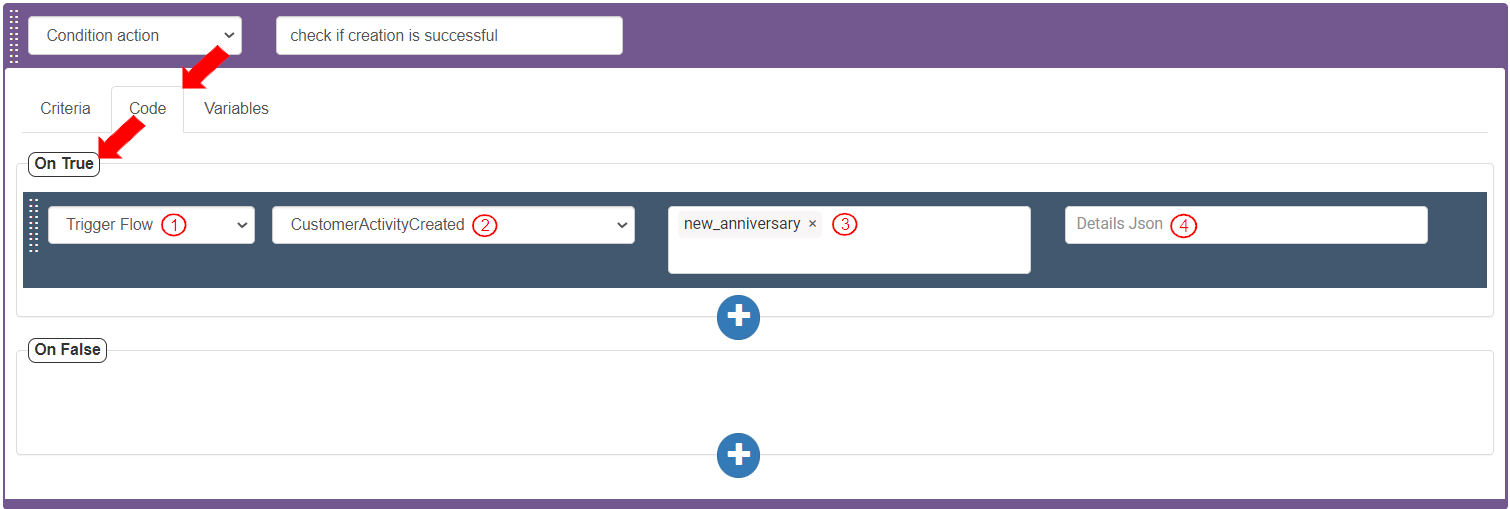
1. To configure the Flow “CustomerActivityCreated” to be triggered when this Process is executed, in the Code tab>On True section, add and define an Action as follows:
1. Select Action as “Trigger Flow”.
2. Select Flow as “CustomerActivityCreated”.
3. Select Entity variable as Variables>new\_anniversary. It is displayed as “new\_anniversary”.
4. Details Json field is empty.
1. To display the Activity\_ID of the created record on the Test Console, add the last Action and define it as follows:
1. Select Action as “Display on test console”.
2. Select Variables>new\_anniversary>Activity\_ID. It will display as “new\_anniversary.Activity\_ID”.
* To save the Process, click the \[Save] button.
* To publish the Process, click the \[Publish] button.