LogoLogo
HomeCommunityLangstack.comCreate free account
  • 🤝Welcome
  • 🙌Support
  • 💡Get started
    • 📕Learn Langstack
      • Introduction to Langstack
        • Application templates
        • Storage frameworks
        • Account administration
      • Basics and essentials
        • What is an API gateway?
        • How to work with an API gateway
        • What is an Entity?
        • What is an Action box?
          • How to create and work with Action boxes
          • How to perform search in Actions
        • What is an Action?
          • How to create and work with Actions
          • Error propagation
          • Actions in Langstack applications
        • What is a Data type?
          • Simple Data types
        • What is a Variable?
          • Naming rules of a Variable
        • What is a Function?
          • Working with Functions
        • Navigating to a Variable or a Function
        • Implicit Type Conversion (ITC)
        • Explicit Type Conversion
        • Implicit and Explicit Type Conversion for Json
        • Next Steps
      • User management
        • What is a Privilege?
        • What are Groups?
        • What are Users?
      • Introduction to REST API
        • API Name
        • API Group name
        • Request and Response body
          • Request body
          • How to create and work with a Request body
          • Response body
          • How to create and work with a Response body
        • Query strings
          • How to create and work with Query strings
        • Headers
          • How to create and work with Headers
        • Path parameter
        • Create your first API: "Hello World!"
          • Working with API options
        • Exercise 1: GET REST API & Return Response Object
          • Step 1: Create API
          • Step 2: Test the API
        • Exercise 2: Delete a published API
        • Next Steps
      • Introduction to Entities
        • Fields
        • Records
        • Relations
        • Options for an Entity
        • Exercise 1: Customer Accounts and Activities
          • Customer accounts
            • Step 1: Create the Customers Entity
            • Step 2: Create the API
            • Step 3: Update entity through API
          • Customer Activities
            • Step 1: Create the Activities entity
            • Step 2: Create a “1 to Many” relation
            • Step 3: Create the API
            • Step 4: Update entity through API
        • Exercise 2: Customer Records
          • Step 1: Create the API
          • Step 2: Test the API
        • Next Steps
      • Programming with Entities
        • Create
        • Read
        • Update
        • Delete
        • JXPResponse
        • Next Steps
      • Using Triggers
        • After Create Trigger
        • After Update Trigger
        • After Delete Trigger
        • Exercise: Entity & Entity triggers
        • Step 1: Define “After Create” Trigger
        • Step 2: Define “After Update” Trigger
      • Connectors
        • Create a connector
        • SFTP Connector
        • MySQL Connector
        • Next Steps
      • Introduction to ETL pipeline
        • Create an ETL pipeline
        • Data Formats in ETL pipeline
          • Reader
          • Writer
          • Field mapping
        • Shared variables for ETL pipeline
        • ETL functions execution sequences overview
        • Displaying Functions
        • How to perform Search in ETL pipeline
        • Exercise 1: Skip Customer records
          • Step 1: Create the ETL pipeline
          • Step 2: Skip records based on Customer_ID
          • Step 3: Store skipped records in a list
          • Step 4: Store the Skipped Customer record
        • Exercise 2: ETL pipeline, CSV source & FTP Connector
        • Exercise 3: ETL pipeline, Database Source & MySQL Connector
        • Exercise 4: ETL pipeline, CSV Source & FTP Connector using Sections
          • Step 1: Create the ETL pipeline
          • Step 2: Reformat the Join_Date Values and define added fields
      • Multiple Executions, Time Duration, Linked App and Execution Status
        • Skip execution while in progress
        • Time duration settings
        • Linked App
        • Options for Delay Types
        • Execution status
      • Validation pipeline
        • Sequence of Validation pipeline
        • Exercise: Customer Information
          • Step 1: Create a Validation pipeline
          • Step 2: Create the API gateway
          • Step 3: Test the Validation pipeline
      • Introduction to Process
        • Create a process
        • Shared variables for a process
        • Exercise: Customer Anniversary Email Activity
          • Step 1: Check if the join date matches the current date
          • Step 2: Test the Process
      • Introduction to Flows & Flow components
        • What is a Flow?
        • What is a Flow component?
          • What is a Flow component Event?
        • Exercise 1: Customer Anniversary Email
          • Step 1: Create the Flow component
          • Step 2: Create the Flow
          • Step 3: Trigger the Flow
          • Step 4: Check records in the target entity
        • Exercise 2: Store list of customers
          • Step 1: Create the Flow component
          • Step 2: Create the Flow
          • Step 3: Create the API
    • 🌍Tour of Langstack (coming soon)
  • 📘In depth learning
    • 📖User Manual (coming soon)
    • 🔗Connectors
      • MS-SQL connector
        • Data type conversions between Langstack and MSSQL
        • Handling data loss in data type conversions
        • Setting up MS-SQL connector
        • MS-SQL connector as Reader and Writer
        • Using MS-SQL connector in ETL pipeline
          • MS-SQL connector as a source
          • MS-SQL connector as a destination
      • Google Drive connector
        • Set up Google Drive Connector
        • Adding Google Drive path in ETL pipeline Streams
        • Setting up GCP Account, GCP Project, API Enablement, and Credentials (Prerequisites)
          • OAuth 2.0 Client Credentials
          • Service Account Key Credentials
          • API Key Credentials
          • Authorization through Redirect URLs
        • Using Google Drive connector in ETL pipeline
          • Specifying file or folder paths
            • Direct file link
            • Folder link and file name
            • Folder path and file name
            • Folder path excluding file name
            • Folder path including file name
          • Google Drive connector as a source
          • Google Drive connector as a destination
      • AWS connector
        • Introduction
        • Set up AWS S3 Connector
          • OAuth 2.0 Client Type
          • Access Key
          • Public
        • Setting up AWS Account
          • Retrieve Client ID and Client Secret
        • Set up Amazon Web Services (Cognito) Console
          • Retrieve Identity Pool Id
          • Manage Permissions for Roles
          • Adding Redirect URL in Amazon Developer Console
          • User Consent for OAuth 2.0 Client through Login with Amazon
          • Retrieve Access Key Credentials
        • Creating a bucket in AWS
        • Using S3 connector in ETL pipeline
          • Specifying paths
          • Examples
            • AWS S3 connector as a source
            • AWS S3 connector as a destination
      • OneDrive connector
        • Set up OneDrive Connector
        • Setting up Microsoft Azure Account
        • Add URL to Authorized Redirect URLs
        • User Consent for Establishing OneDrive Connection
        • Usage of OneDrive Connector in ETL pipeline
          • Examples
          • OneDrive connector as a source
          • OneDrive connector as a destination
      • Dropbox connector
        • Set up Dropbox Connector
        • Setting up Dropbox Account
        • Add URL to Authorized Redirect URLs
        • User Consent for Establishing Dropbox Connection
        • Usage of Dropbox connector in ETL pipeline
          • Dropbox connector path settings
          • Examples
            • Dropbox connector as a source
            • Dropbox connector as destination
  • 🗃️Use Cases (Coming soon)
    • Use Case 1
    • Use Case 2
    • Use Case 3
Powered by GitBook
On this page
  • Time Duration settings for Immediate execution
  • Time Duration settings for Multiple executions
  1. Get started
  2. Learn Langstack
  3. Multiple Executions, Time Duration, Linked App and Execution Status

Time duration settings

PreviousSkip execution while in progressNextLinked App

Last updated 2 years ago

The Time duration settings define the time and frequency for executing the ETL pipeline or Process. The ETL pipeline or Process may be set up to run in two (2) ways:

  • Immediate

  • Scheduled

Time Duration settings for Immediate execution

By default, the ETL pipeline or Process is defined to run immediately; therefore, the option “Immediate” is preselected.

Time Duration settings for Multiple executions

There are two (2) settings for Scheduled Execution of the ETL pipeline or Process: Once and Recurring.

Scheduled Execution as “Once”

If Scheduled option is selected, by default, the ETL pipeline or Process is defined to be scheduled once; therefore, the option “Once” is selected with the following settings:

  • The Start date value is by default set to the current date.

  • The Start time value is by default set to the current time.

Scheduled Execution as “Recurring”

Users can define the settings for recurring ETL pipeline or Process execution with the following fields:

  • The Start date value is displayed with the current date.

  • The Start time value is displayed with the current time.

  • The End date for the ETL pipeline or Process to end.

  • The Occurrence defines the frequency of the execution of the ETL pipeline or Process. By default, it is set to “hourly” with the number “1” (once every hour).

Options for recurring execution

The options for recurring execution are as follows:

  • Hourly: The occurrence is on an hourly basis, i.e., “once every (*) hours”. When the “hourly” option is selected, the setting is defined as “once every hour” by default.

  • Daily: The occurrence is daily, i.e.,“(*) times per day”. When the “daily” option is selected, the setting is default defined as “once every day”.

  • Weekly: The occurrence is on a weekly basis, i.e., “every week, (*) times on ‘selected day(s)’. When the “weekly” option is selected, the setting is defined as “once every Monday”. In the image below, the setting defines the ETL pipeline or Process to run “every week once on Mondays”.

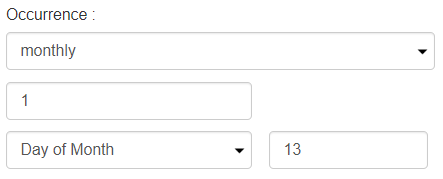
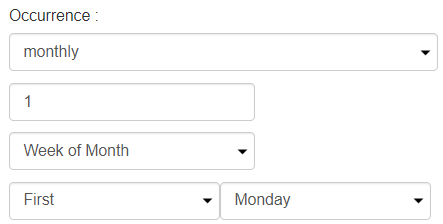
  • Monthly: The occurrence is every month with the following two (2) options:

    • “every month, (*) times on ‘selected day of the month’. On selecting a monthly occurrence with “Day of Month”, the setting is defined as “once every month, on day 15”.

    • “every month, (*) times on the specified day in the selected week of the month”. On selecting a monthly occurrence with “Week of Month”, the setting is defined as “once every month on Monday of the first week of the month”.

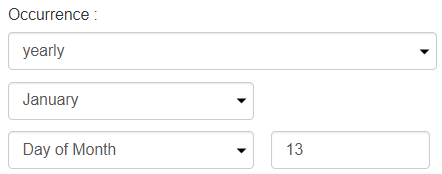
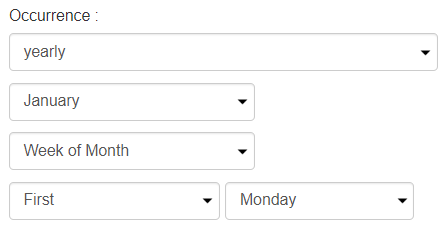
  • Yearly: The occurrence is once a month with two (2) options:

    • “every year, in the selected month on the ‘selected day of the month’”. On selecting a yearly occurrence with “Day of Month”, the setting is defined as “once every year, in January, on day 15 of the month”.

    • “every year, in the selected month, in the selected week, on the ‘selected day of the month’”. On selecting a monthly occurrence with “Week of Month”, the setting is defined as “once every year, in January, in the first week, on Monday”.

💡
📕