> For the complete documentation index, see [llms.txt](https://docs.langstack.com/welcome/llms.txt). Markdown versions of documentation pages are available by appending `.md` to page URLs; this page is available as [Markdown](https://docs.langstack.com/welcome/get-started/learn-langstack/introduction-to-flows-and-flow-components/exercise-2-store-list-of-customers/step-3-create-the-api.md).
# Step 3: Create the API
Create an API to trigger the Flow to create records from the list of customers and store them in the “UserName\_Acc\_customers” Entity created in Step 1.
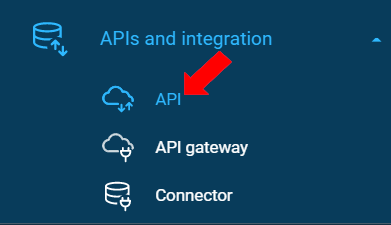
* To go to APIs, click “API” under the “APIs and integration” menu on the left side panel.
* To create a new API, click the \[+ API] button.
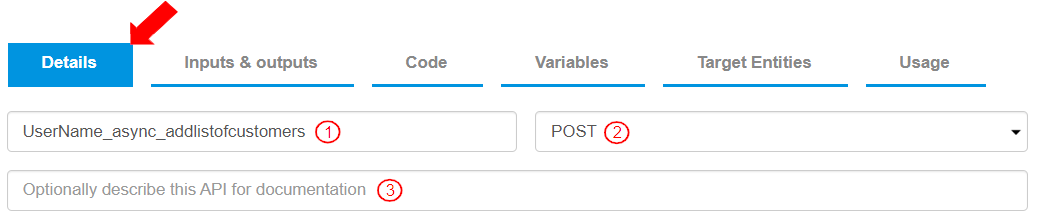
* The New API page displays with the Details tab preselected. To define the API, add the following information:
1. Enter the API name as “UserName\_async\_addlistofcustomers”. The name indicates that a customer has been added.
2. Select the API method as “POST”. This defines that the API will post or send data.
3. Optionally add a description for the API.
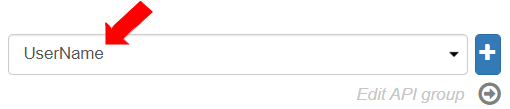
* Create a new Group Name by clicking \[+].
1. Enter the Group name as “UserName”.
2. Enter the Group base URL as “UserName”.
3. To save the Group name details, click \[Save].
* Add API Paths as “async” and “addlistofcustomers”. \
Each parameter displays in a blue bubble.
* The URL for the API is generated.
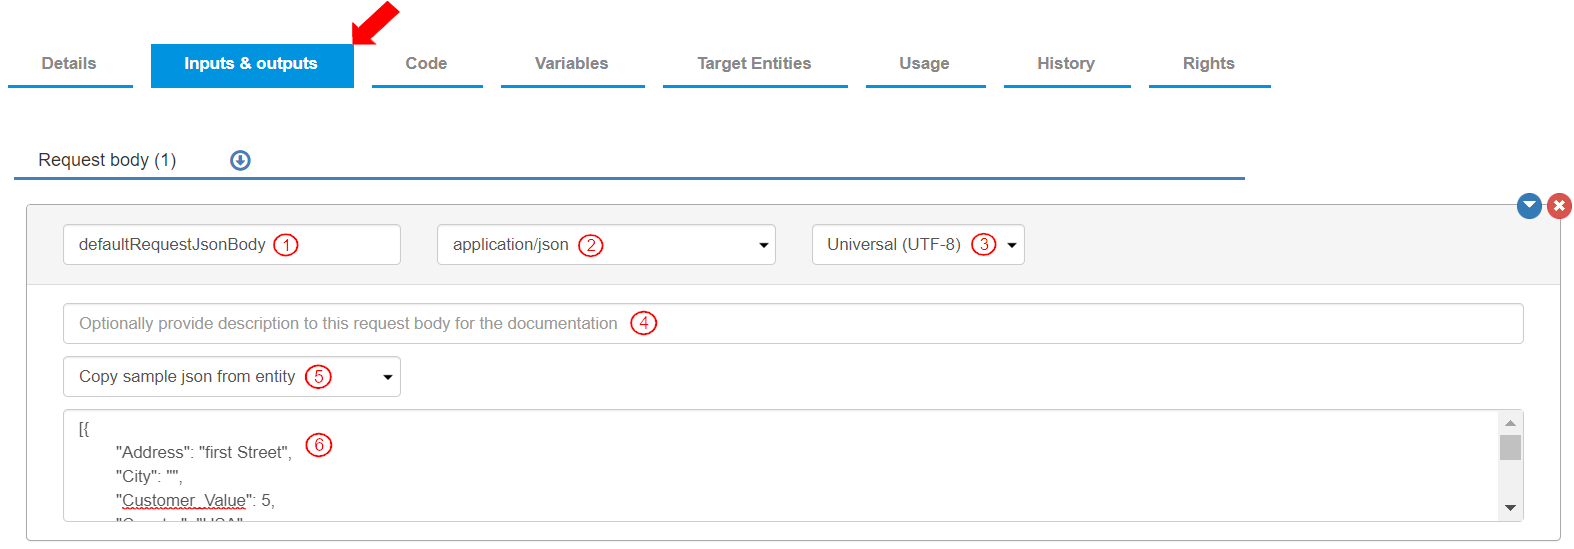
* To define the Request body and Response body details, go to the “Inputs & outputs” tab.
* To define the Request Body, go to the Inputs & outputs tab>Request body section. \
Click it to expand the already created Request body. It is defined with the following information:
1. By default, the name for the request body is “defaultRequestJsonBody”. For this exercise, label it as “requestJsonCreateCustomer”.
2. Content type from the list of values is selected as “application/json”. This defines the type of content in the request.
3. Character set is selected as “Universal (UTF-8)”.
4. Optionally enter a description for the “Request Body”. (This is used in the API documentation.)
5. To define the json sample for the request, add the following Json:
\[{ "Address\_Line\_1": "first Street", "City": "", "Customer\_Value": 5, "Country": "USA", "Email": "", "First\_Name": "Jane", "IsActive": true, "Join\_Date": "2021-09-15", "Last\_Name": "Doe", "Phone": "1237865", "Rating": 1000, "Zip\_Code": "45"
}]
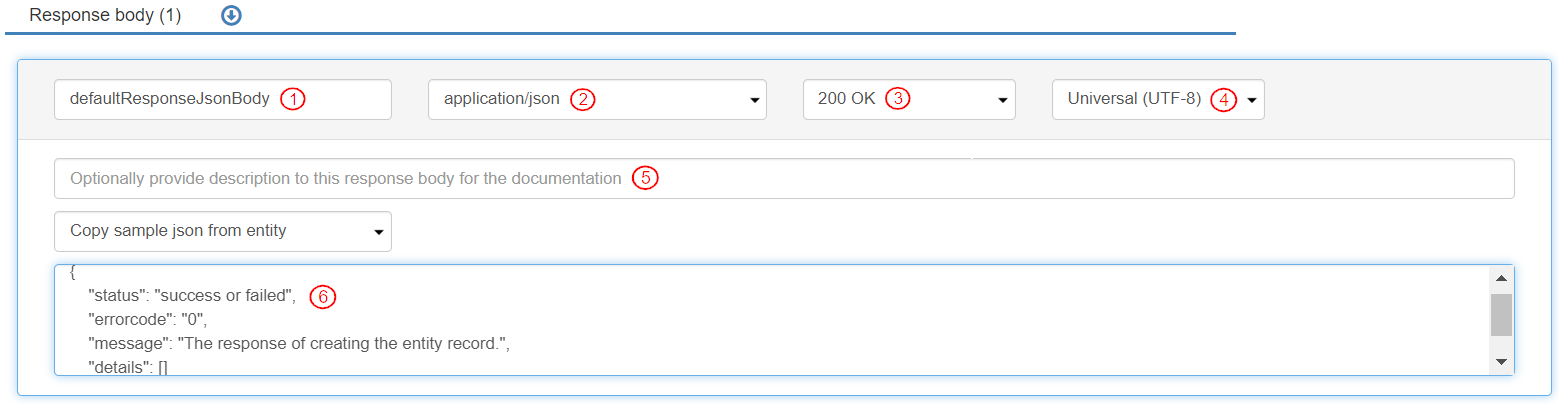
* To define the Response body, go to the Inputs & outputs tab>Response body section and click it to expand it. A Response body is already created and defined with the following information:
1. By default, the name for the response body is “defaultResponseJsonBody”. For this exercise, keep the response body name as is.
2. The Content type from the list of values is selected as “application/json”. This defines the type of content in the response.
3. The Response Code is selected as “200 OK”.
4. Character set is selected as “Universal (UTF-8)”.
5. Optionally add a description for the “Response Body”(This is used in the API documentation).
6. To define a sample Json for the response, type the following json object: \
\
`{` \
`"status": "success or failed",`\
`"errorcode": "0",`
`"message": "The response of creating the entity record.",`
`"details": []` \
`}` \
\
This object indicates that: \
\- The status is “success” or “failed”. \
\- The error code is zero (0). \
\- The message displayed is “The response of creating the entity record”. \
\- The details will be a list of values as identified by the two square brackets “\[]”
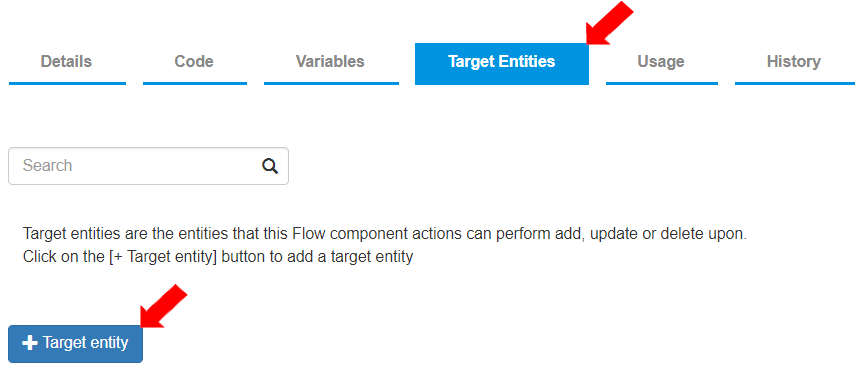
* To define the Target entity for this API, go to the “Target Entities” tab. \
Target entities are the entities that the Actions in this API can process data into i.e. perform add, update, or delete upon. \
To create a new target entity, click \[+ Target entity].
* To define the Target Entity for storing the created record:
1. Select Target Entity as “UserName\_Acc\_customers”.
2. Keep “select a default validation” as is. \
If a Validation pipeline needs to be applied to the data before storing in an entity, the relevant Validation pipeline can be selected in this field. In this exercise, no Validation pipeline is applied.
3. “Show in API gateways” toggle button is enabled by default. \
This must be enabled so that the API is visible to the API gateway through which it can process the information into the entity.
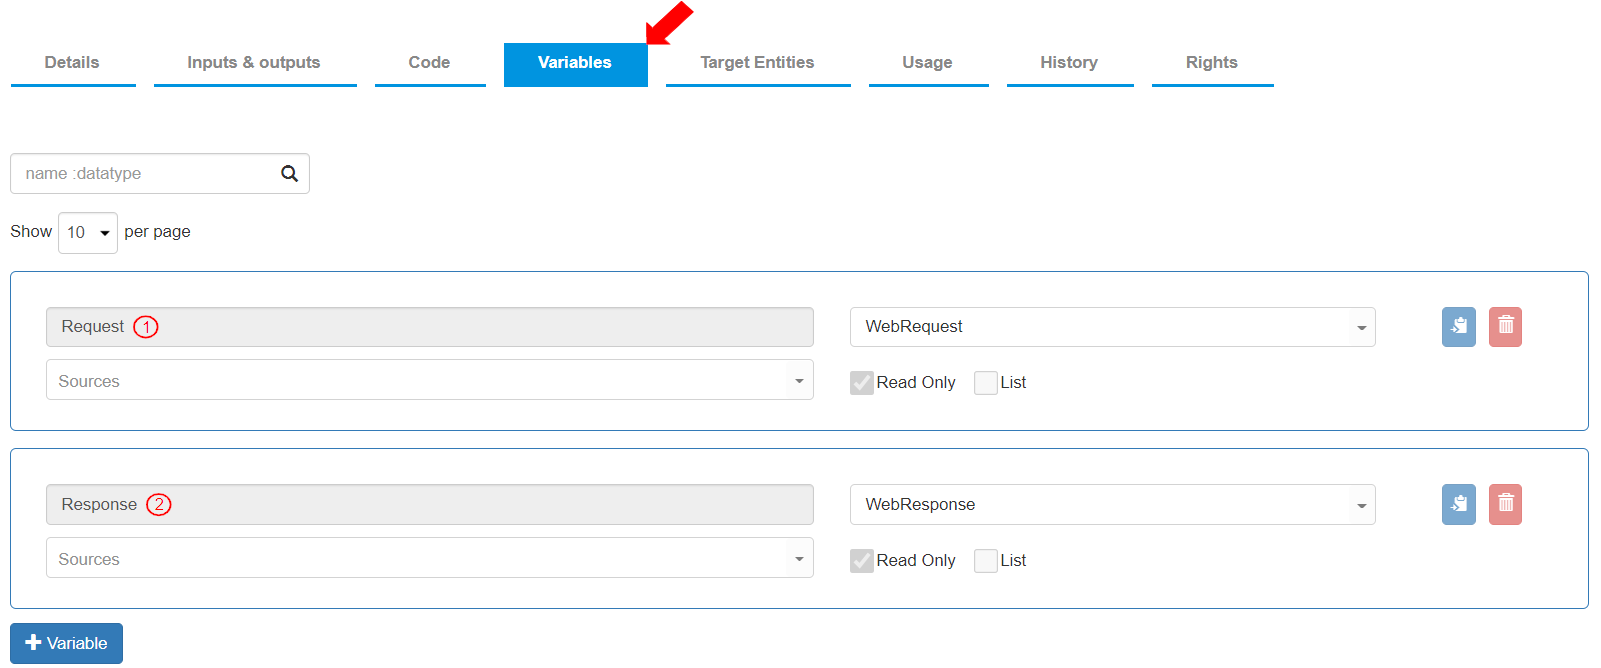
* To see the default variables created for an API, go to the “Variables” tab. The following two (2) Read Only variables are predefined:
1. Variable Name: “Request”, Data Type: “WebRequest”. This variable contains the Web Request received.
2. Variable Name: “Response”, Data Type: “WebResponse”. This variable contains the Web Response sent.
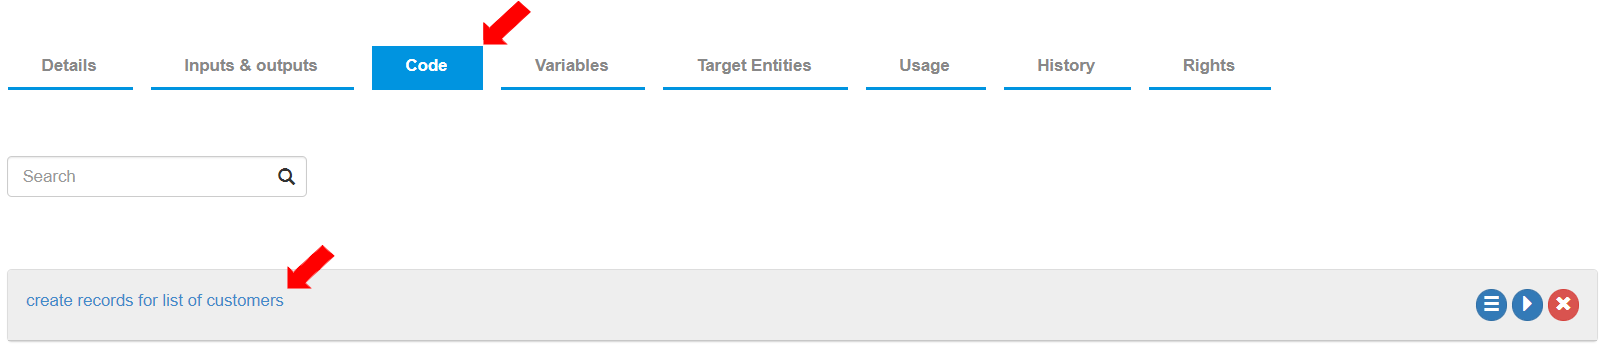
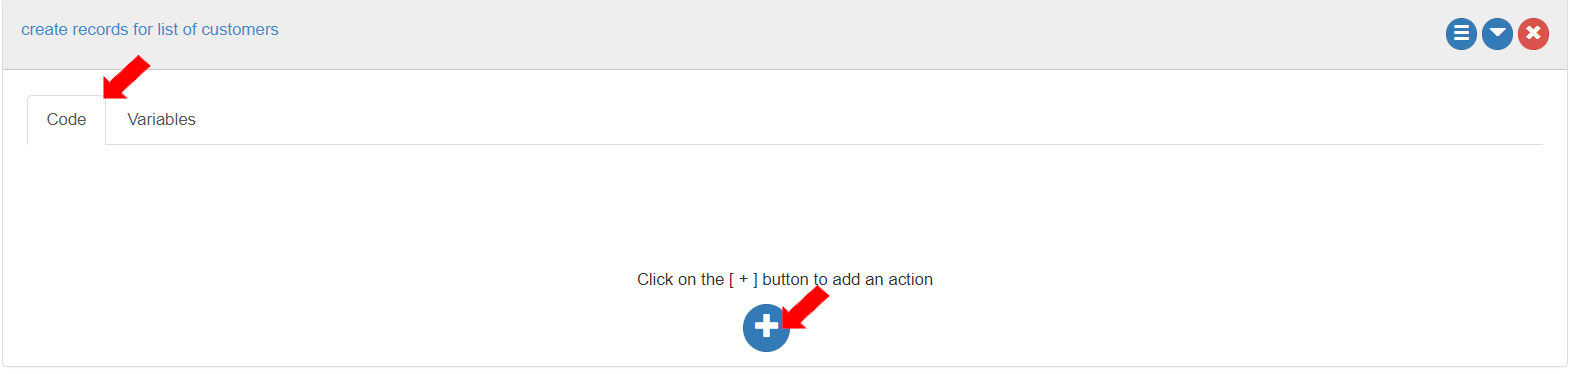
* To create Actions for this API, go to the “Code” tab. By default, an “Action box” is already created with the description of the “Action box” as “OnExit”. \
To change the “Action box” label, double click the description and label the Action box as “create records for list of customers”. \
In this “Action box”, the records will be updated in the entity “UserName\_Acc\_customers” based on the request received.
* Click on the arrow on the top right corner of the “Action box” to expand it. \
In the “Code” tab, an Action called “API Respond” is already added. Notice the variable as “defaultResponseJsonBody”.\
Remove this action for now.
* First, the variables need to be defined and initialized. To define the variables, go to the “Variables” tab of the “Action box”. \
To create a new variable, click the \[+ Variable] button.
* To contain the values for the fields of the desired entity in a record, define the variable as follows:
1. Enter Variable Name as “triggerCustomerRecord”.
2. Select Data Type as the Entity “UserName\_Acc\_customers”.
* To contain the values for the Json fields received in the request, define the variable as follows:
1. Enter Variable Name as “detailsJS”.
2. Select Data Type as the Entity “Json”.
* To define the Json sample (layout in which the list of customers will be received in the request), click the \[Sample] button.
* Add the following Json sample in the Sample Schema View: \
\
`{ "customerslist": [{` \
`"Address": "first Street",`
`"City": "",`
`"Customer_Value": 5,`
`"Country": "USA",`
`"Email": "JaneDoe@mail.com",`
`"First_Name": "Jane",`
`"IsActive": true,`
`"Join_Date": "2021-09-15",`
`"Last_Name": "Doe",`
`"Phone": "1237865",`
`"Rating": 1000,`
`"Zip_Code": "45" }]`\
`}`
To save the Sample Schema, click the \[Save] button.
* To define the actions for this API, go to the “Code” tab of the Action box and add three (3) Actions.
* Define the first three actions to acknowledge the request and to send the response that the request is queued. To send the response code, redefine the first, existing first Action as follows:
1. Select Action as “Update Variable”.
2. Select Target Value as Response>defaultResponseJsonBody>errorcode. It displays as “Response.defaultResponseJsonBody.errorcode”.
3. Enter Value as “200” and press Enter.
* To send the response message, add the second Action and define it as follows:
1. Select Action as “Update Variable”.
2. Select Target Value as Response>defaultResponseJsonBody>message. It displays as “Response.defaultResponseJsonBody.message”.
3. Enter Value as “Your request is now queued for processing.” and press Enter.
* To send the response status, add the third Action and define it as follows:
1. Select Action as “Update Variable”.
2. Select Target Value as Response>defaultResponseJsonBody>status. It displays as “Response.defaultResponseJsonBody.status”.
3. Enter Value as “Request Queued” and press Enter.
* Once the response has been sent, the created Flow will be triggered to create the customer record. To trigger a Flow, it is mandatory that an entity record is loaded.
* To create the record to load and ensure it does not get deleted, for this exercise, go to the “UserName\_Acc\_customers” entity and create a record as follows:
1. Address: DO NOT DELETE
2. City: DO NOT DELETE
3. Country: DO NOT DELETE
4. Customer\_ID: (autogenerated)
5. Customer\_Value: 1
6. DayMonthJoinDate: (current day and month)
7. First\_Name: DO NOT DELETE
8. IsActive: true
9. Join\_Date: (current day and month)
10. Last\_Name: DO NOT DELETE
11. Phone: DO NOT DELETE
* To load the entity record for triggering the Flow, go to the API, add the fourth Action, and define it as follows:
1. Select Action as “Load Entity record”.
2. Select Target Value as “triggerCustomerRecord”.
3. Click on the Setup Criteria button to define the settings for this Action.

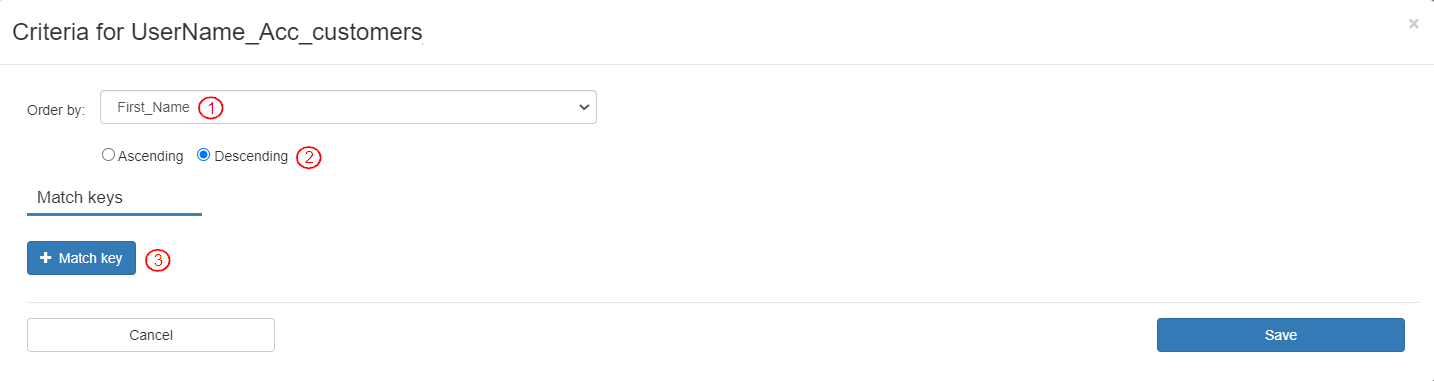
* To define the Setup criteria for the entity record:
1. Select Order by as “First\_Name”.
2. By default, the “Descending” option is selected. Keep it as is.
3. Add a match key by clicking the \[+ Match key] button.
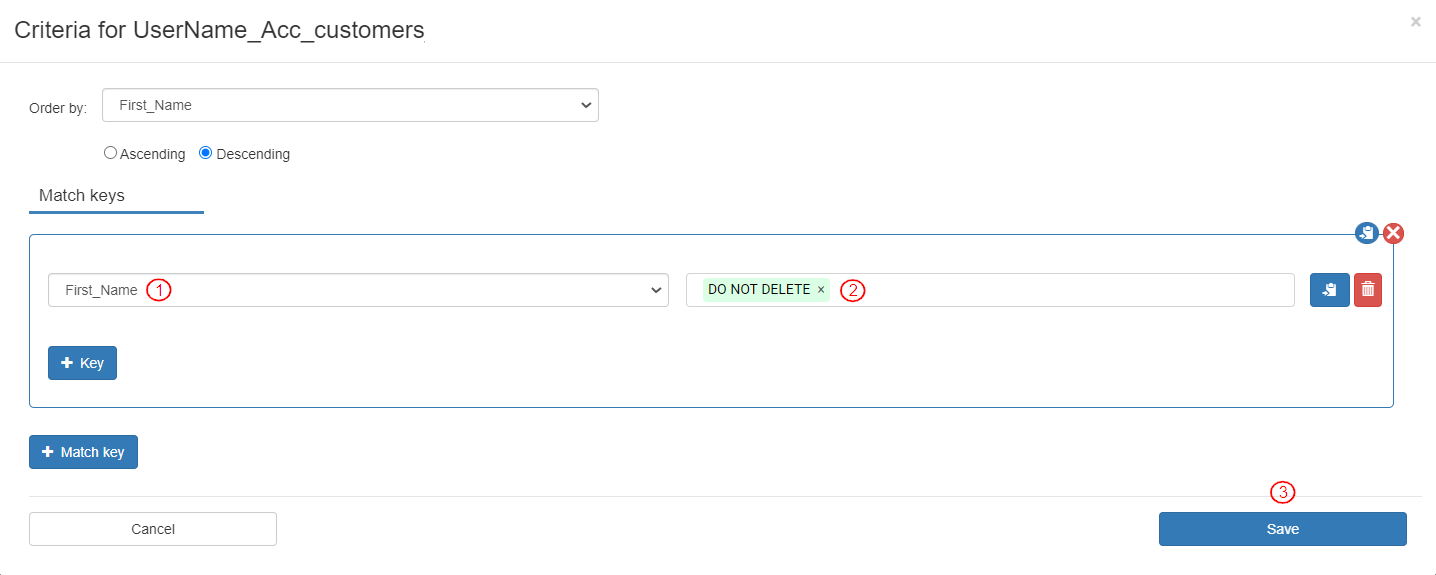
* To match the First\_Name field of the entity to “DO NOT DELETE” text, define the match key as follows:
1. Select Field as “First\_Name”.
2. Enter Source as “DO NOT DELETE”.
3. To save the settings, click the \[Save] button.
* To update the request into the Json field to be loaded with the entity while triggering Flow, add and define the fifth Action as follows:
1. Select Action as “Update Variable”.
2. Select Target Value as detailsJS>customerslist. It displays as “detailsJS.customerslist”.
3. Enter Value as Variables>Request>defaultRequestJsonBody. It displays as “Request.defaultRequestJsonBody”.
* To trigger the Flow, add and define the sixth Action with the entity variable and Json sample as follows:
1. Select Action as “Trigger Flow”.
2. Select Flow as “UserName\_createlistofcustomers”. Select Entity variable as Variables>triggerCustomerRecord. It displays as “triggerCustomerRecord”.
3. Select Json as Variables>detailsJS. It displays as “detailsJS”.
* To send the API response, add the last Action and define it as follows:
1. Select Action as “API Respond”.
2. Select Response body as “defaultResponseJsonBody”.

* To save the API, click the \[Save] button.
* To publish the API, click the \[Publish] button.
* To define the API gateway, go to the Details tab and add the API gateway for this API as “UserName\_async\_addlistofcustomers”. Save the API again.
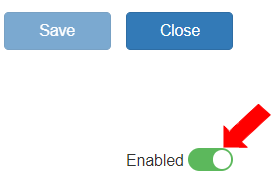
* Ensure the API is enabled in the “Details” tab on the right-hand side.
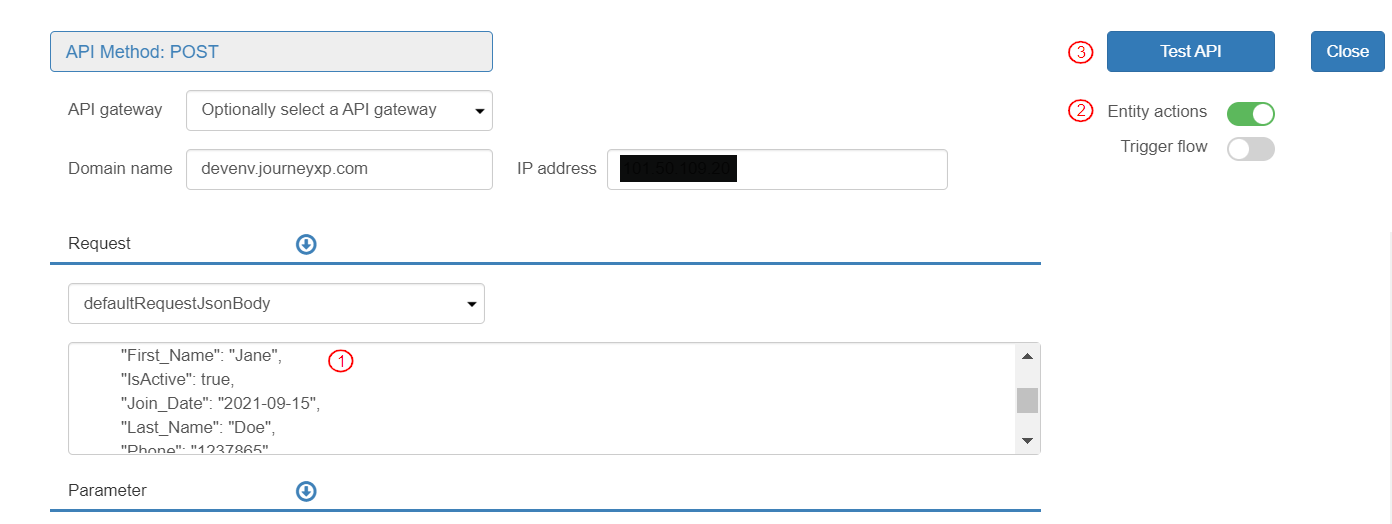
* To test the API, click the \[Test] button.
* In the Test Console:
1. Add the values of the list of customers.
2. Enable the \[Entity actions] toggle button.
3. Click \[Test API].
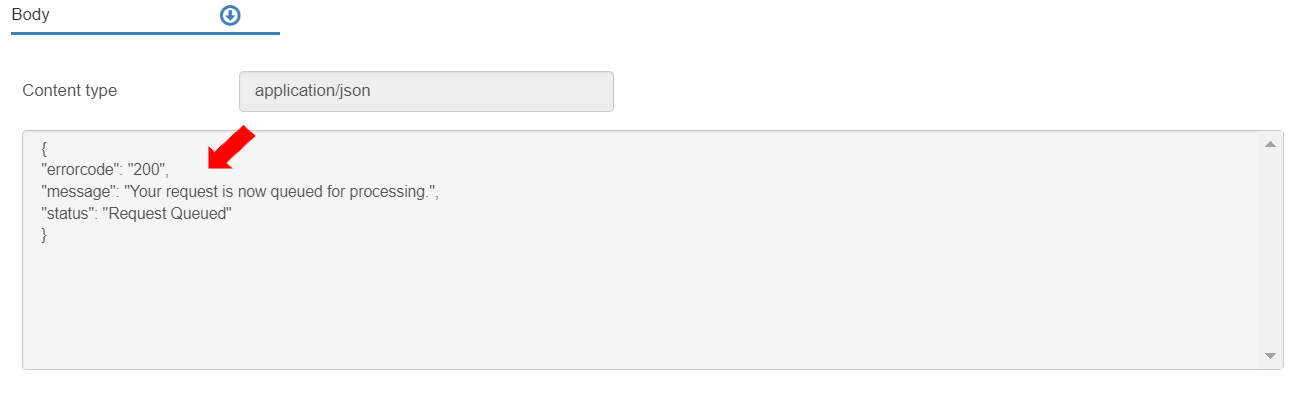
* To see the Response, go to the Body section in the Test Console. The response message displays stating that the request is queued for processing.