LogoLogo
HomeCommunityLangstack.comCreate free account
  • 🤝Welcome
  • 🙌Support
  • 💡Get started
    • 📕Learn Langstack
      • Introduction to Langstack
        • Application templates
        • Storage frameworks
        • Account administration
      • Basics and essentials
        • What is an API gateway?
        • How to work with an API gateway
        • What is an Entity?
        • What is an Action box?
          • How to create and work with Action boxes
          • How to perform search in Actions
        • What is an Action?
          • How to create and work with Actions
          • Error propagation
          • Actions in Langstack applications
        • What is a Data type?
          • Simple Data types
        • What is a Variable?
          • Naming rules of a Variable
        • What is a Function?
          • Working with Functions
        • Navigating to a Variable or a Function
        • Implicit Type Conversion (ITC)
        • Explicit Type Conversion
        • Implicit and Explicit Type Conversion for Json
        • Next Steps
      • User management
        • What is a Privilege?
        • What are Groups?
        • What are Users?
      • Introduction to REST API
        • API Name
        • API Group name
        • Request and Response body
          • Request body
          • How to create and work with a Request body
          • Response body
          • How to create and work with a Response body
        • Query strings
          • How to create and work with Query strings
        • Headers
          • How to create and work with Headers
        • Path parameter
        • Create your first API: "Hello World!"
          • Working with API options
        • Exercise 1: GET REST API & Return Response Object
          • Step 1: Create API
          • Step 2: Test the API
        • Exercise 2: Delete a published API
        • Next Steps
      • Introduction to Entities
        • Fields
        • Records
        • Relations
        • Options for an Entity
        • Exercise 1: Customer Accounts and Activities
          • Customer accounts
            • Step 1: Create the Customers Entity
            • Step 2: Create the API
            • Step 3: Update entity through API
          • Customer Activities
            • Step 1: Create the Activities entity
            • Step 2: Create a “1 to Many” relation
            • Step 3: Create the API
            • Step 4: Update entity through API
        • Exercise 2: Customer Records
          • Step 1: Create the API
          • Step 2: Test the API
        • Next Steps
      • Programming with Entities
        • Create
        • Read
        • Update
        • Delete
        • JXPResponse
        • Next Steps
      • Using Triggers
        • After Create Trigger
        • After Update Trigger
        • After Delete Trigger
        • Exercise: Entity & Entity triggers
        • Step 1: Define “After Create” Trigger
        • Step 2: Define “After Update” Trigger
      • Connectors
        • Create a connector
        • SFTP Connector
        • MySQL Connector
        • Next Steps
      • Introduction to ETL pipeline
        • Create an ETL pipeline
        • Data Formats in ETL pipeline
          • Reader
          • Writer
          • Field mapping
        • Shared variables for ETL pipeline
        • ETL functions execution sequences overview
        • Displaying Functions
        • How to perform Search in ETL pipeline
        • Exercise 1: Skip Customer records
          • Step 1: Create the ETL pipeline
          • Step 2: Skip records based on Customer_ID
          • Step 3: Store skipped records in a list
          • Step 4: Store the Skipped Customer record
        • Exercise 2: ETL pipeline, CSV source & FTP Connector
        • Exercise 3: ETL pipeline, Database Source & MySQL Connector
        • Exercise 4: ETL pipeline, CSV Source & FTP Connector using Sections
          • Step 1: Create the ETL pipeline
          • Step 2: Reformat the Join_Date Values and define added fields
      • Multiple Executions, Time Duration, Linked App and Execution Status
        • Skip execution while in progress
        • Time duration settings
        • Linked App
        • Options for Delay Types
        • Execution status
      • Validation pipeline
        • Sequence of Validation pipeline
        • Exercise: Customer Information
          • Step 1: Create a Validation pipeline
          • Step 2: Create the API gateway
          • Step 3: Test the Validation pipeline
      • Introduction to Process
        • Create a process
        • Shared variables for a process
        • Exercise: Customer Anniversary Email Activity
          • Step 1: Check if the join date matches the current date
          • Step 2: Test the Process
      • Introduction to Flows & Flow components
        • What is a Flow?
        • What is a Flow component?
          • What is a Flow component Event?
        • Exercise 1: Customer Anniversary Email
          • Step 1: Create the Flow component
          • Step 2: Create the Flow
          • Step 3: Trigger the Flow
          • Step 4: Check records in the target entity
        • Exercise 2: Store list of customers
          • Step 1: Create the Flow component
          • Step 2: Create the Flow
          • Step 3: Create the API
    • 🌍Tour of Langstack (coming soon)
  • 📘In depth learning
    • 📖User Manual (coming soon)
    • 🔗Connectors
      • MS-SQL connector
        • Data type conversions between Langstack and MSSQL
        • Handling data loss in data type conversions
        • Setting up MS-SQL connector
        • MS-SQL connector as Reader and Writer
        • Using MS-SQL connector in ETL pipeline
          • MS-SQL connector as a source
          • MS-SQL connector as a destination
      • Google Drive connector
        • Set up Google Drive Connector
        • Adding Google Drive path in ETL pipeline Streams
        • Setting up GCP Account, GCP Project, API Enablement, and Credentials (Prerequisites)
          • OAuth 2.0 Client Credentials
          • Service Account Key Credentials
          • API Key Credentials
          • Authorization through Redirect URLs
        • Using Google Drive connector in ETL pipeline
          • Specifying file or folder paths
            • Direct file link
            • Folder link and file name
            • Folder path and file name
            • Folder path excluding file name
            • Folder path including file name
          • Google Drive connector as a source
          • Google Drive connector as a destination
      • AWS connector
        • Introduction
        • Set up AWS S3 Connector
          • OAuth 2.0 Client Type
          • Access Key
          • Public
        • Setting up AWS Account
          • Retrieve Client ID and Client Secret
        • Set up Amazon Web Services (Cognito) Console
          • Retrieve Identity Pool Id
          • Manage Permissions for Roles
          • Adding Redirect URL in Amazon Developer Console
          • User Consent for OAuth 2.0 Client through Login with Amazon
          • Retrieve Access Key Credentials
        • Creating a bucket in AWS
        • Using S3 connector in ETL pipeline
          • Specifying paths
          • Examples
            • AWS S3 connector as a source
            • AWS S3 connector as a destination
      • OneDrive connector
        • Set up OneDrive Connector
        • Setting up Microsoft Azure Account
        • Add URL to Authorized Redirect URLs
        • User Consent for Establishing OneDrive Connection
        • Usage of OneDrive Connector in ETL pipeline
          • Examples
          • OneDrive connector as a source
          • OneDrive connector as a destination
      • Dropbox connector
        • Set up Dropbox Connector
        • Setting up Dropbox Account
        • Add URL to Authorized Redirect URLs
        • User Consent for Establishing Dropbox Connection
        • Usage of Dropbox connector in ETL pipeline
          • Dropbox connector path settings
          • Examples
            • Dropbox connector as a source
            • Dropbox connector as destination
  • 🗃️Use Cases (Coming soon)
    • Use Case 1
    • Use Case 2
    • Use Case 3
Powered by GitBook
On this page
  • Setting up a GCP Account
  • Create GCP Project
  • Enable Google Drive API
  1. In depth learning
  2. Connectors
  3. Google Drive connector

Setting up GCP Account, GCP Project, API Enablement, and Credentials (Prerequisites)

PreviousAdding Google Drive path in ETL pipeline StreamsNextOAuth 2.0 Client Credentials

Last updated 2 years ago

Follow this section to understand and complete the prerequisites for setting up the Google Drive Connector.

Setting up a GCP Account

A GCP Account needs to be configured to enable the Google Drive API before establishing a connection. This involves creating a project and enabling the Google Drive API in that project.

Google Cloud projects form the basis for creating, enabling, and using all Google Cloud services including managing APIs, enabling billing, adding and removing collaborators, and managing permissions for Google Cloud resources.

Without enabling the Google Drive API, communication cannot take place between Langstack and Google Drive as a connector.

Following are the detailed steps with screenshots to configure the GCP Account.

Create GCP Project

To use Google Drive API, you need a Google Cloud Platform Project. A Project in GCP contains the settings for the Google API to be enabled (in this case, we need to enable Google Drive API) and how an App communicates with the Google Drive (the permissions or scope of data).

To create a new Google Cloud Platform (GCP) Project, proceed as follows.

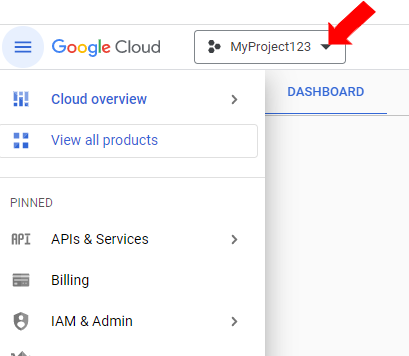
  • Open the Google Cloud Console

  • Login to your Google Account.

  • After Login, next to “Google Cloud Platform”, click the downward arrow.

  • Click on New Project.

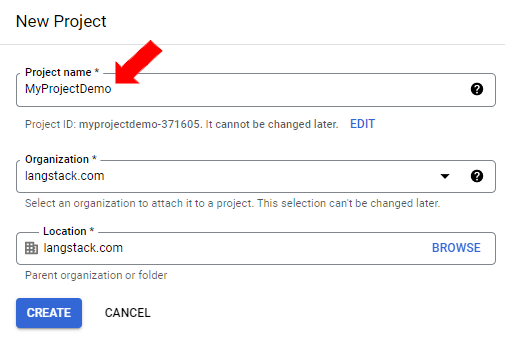
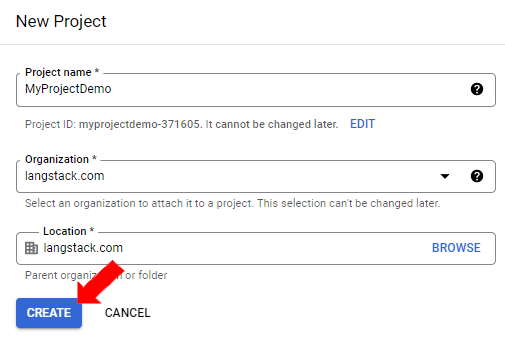
  • The navigation displays the New Project screen. In the Project Name field, enter a descriptive name for your project.

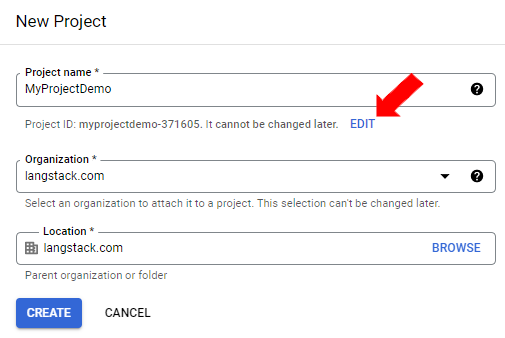
  • To edit the Project ID, click Edit (Optional). The project ID cannot be changed after the project is created.

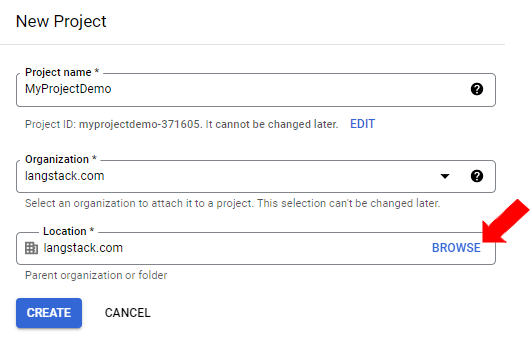
  • In this case, the Location name is provided. To add a new Location, click Browse to display potential locations for your project.

  • Then click the [ Create ] button to create this project.

  • The console navigates to the Dashboard page and your project is created.

Enable Google Drive API

In the created project, the user needs to enable the Google Drive API to allow access to the resources on the Google Drive.

  • Next to "Google Cloud Platform," click the downward arrow and select a project for which the API needs to be enabled. In this case, choose the project you created for this exercise.

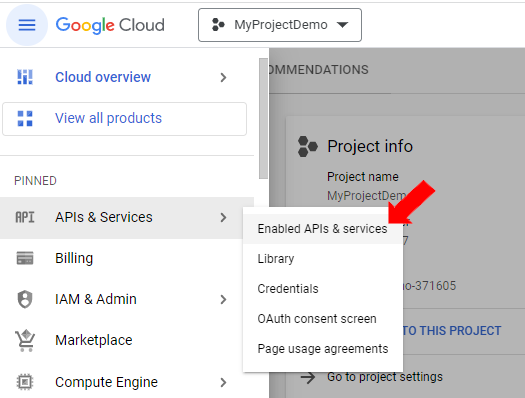
  • In the top-left corner, click on the Navigation Menu. 
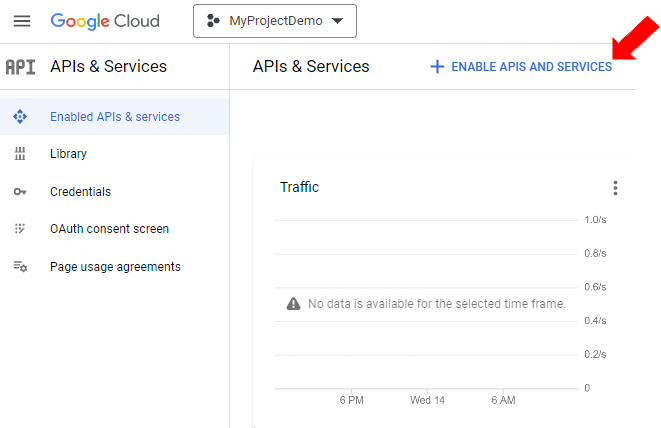
In the “All Products” category, click APIs & Services>Enabled APIs & Services.

  • Click [+ Enable APIs and Services].

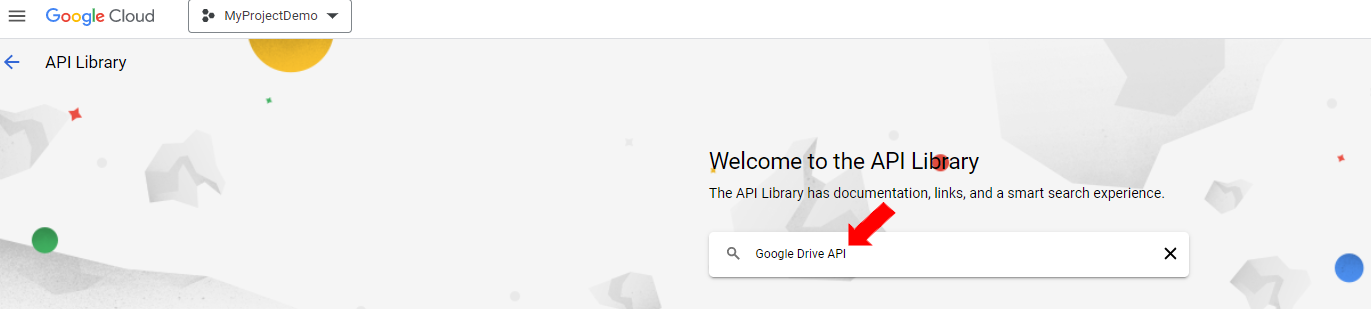
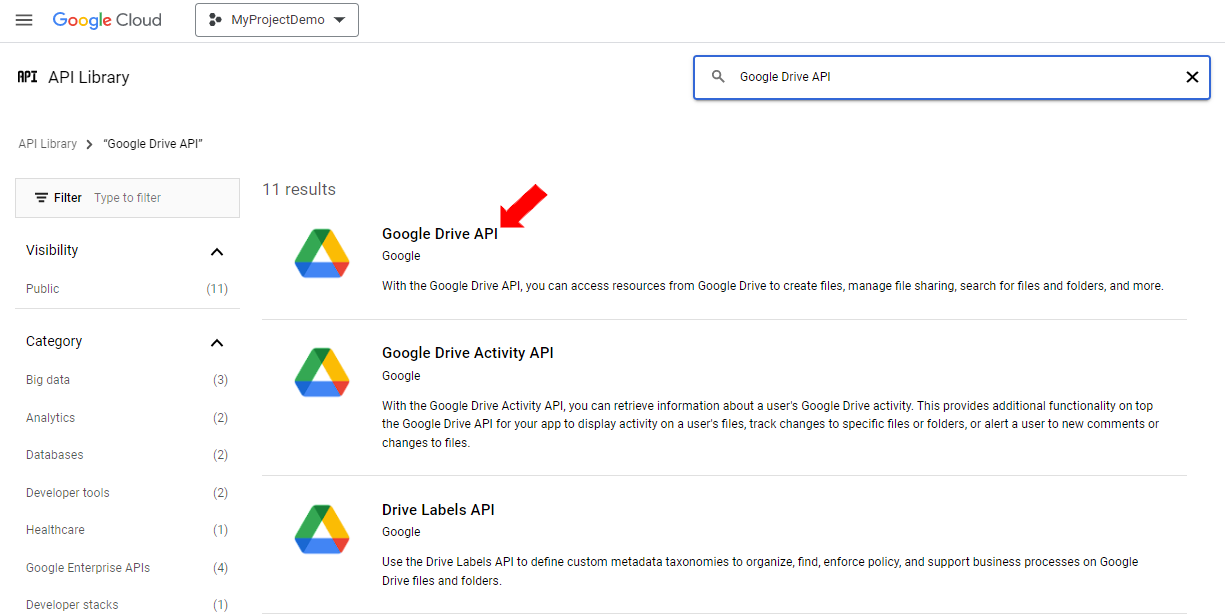
  • In the search field, enter the name of the API you want to enable. For example, type "Google Drive API" to find the Google Drive API.

  • The API page appears. Click the API “Google Drive API”.

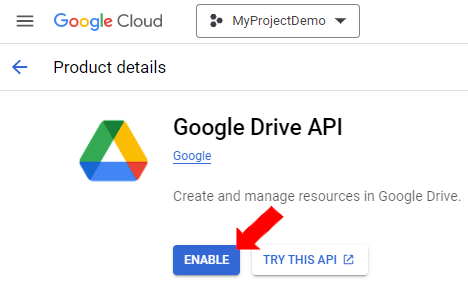
  • Click Enable. The API gets enabled.

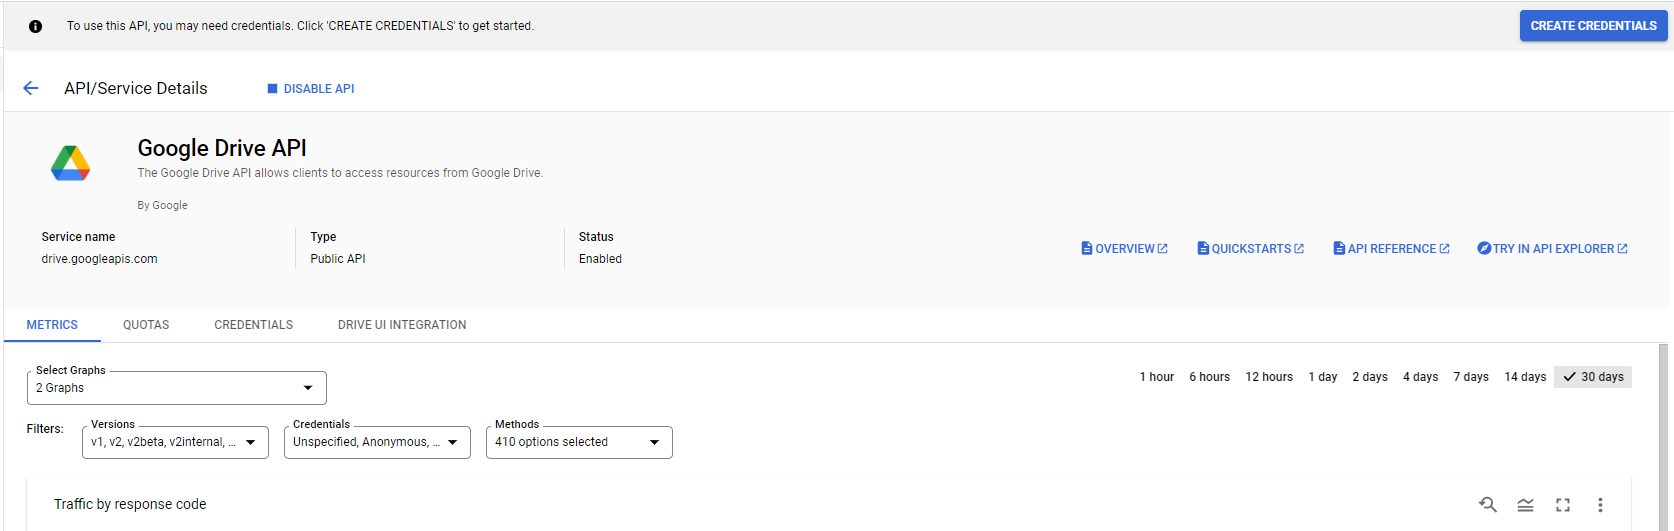
  • The API/Service Details page appears. The Google Account has been set up to create credentials.

Open the.

📘
🔗
Google Cloud Console
https://console.cloud.google.com/